The garden came with a brick double barbecue. The top courses have always been loose, but things got worse when I realised the bricks were a perfect match for my chimney and I stole much of the top course.
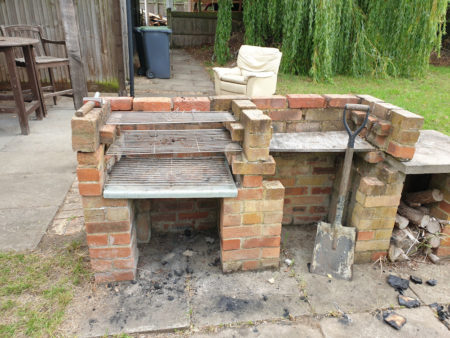
I took the BBQ down about 4 courses until the bricks seemed secure then built it back up loosely. A lot of the bricks were damaged so some bricks left over from the new build next door were used to make up the numbers.
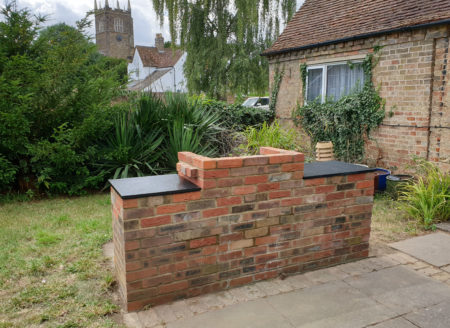
The new bricks are quite nice but didn’t match. Over a few evenings the bricks were rearranged a few times to try out some ideas. The BBQ was steadily redesigned and ended up a course higher than the photo with the bricks arranged in a chevron pattern.
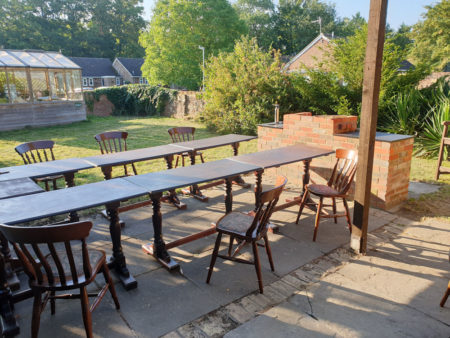
The work tops in the picture are roof slates positioned to see whether slate would look nicer than concrete.
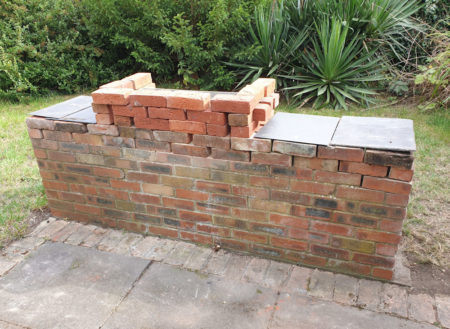
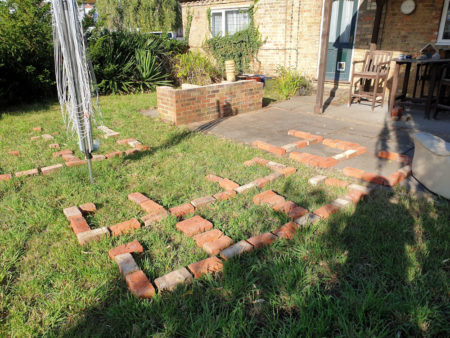
Once happy with the pattern the bricks were positioned on the lawn in their courses. This worked really well and I didn’t once get the bricks mixed up while I was rebuilding the BBQ. Later all of the courses were moved onto the lawn as it helped keep the underside of the bricks damp.
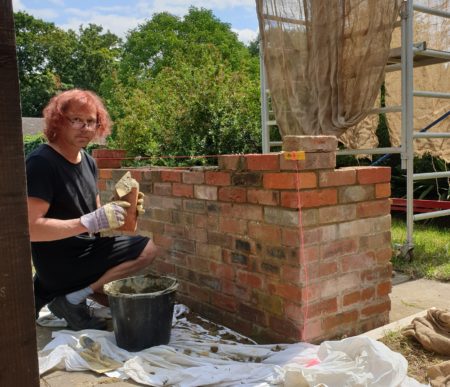
The sun was hot this week and the bricks were thirsty and needed a lot of spraying. The scaffold tower was put up with hessian sheet over it to keep the sun off me and the new cement. Otherwise it would have been far too hot.
The BBQ was originally built in cement so I used cement to match. It’s the first time I’ve used cement for brickwork and I’m not used to it. I don’t like the stuff. I’m not the first to rebuild the BBQ and it’s in metric bricks so post 1965. Things shouldn’t need to be rebuilt this often, and getting the cement off the bricks was a real pain.
There was a fair mix of different bricks from previous rebuilds and it’s awkward to lay bricks when one of the bricks underneath has a deep frog, then the one beside it has no frog or is full of old cement.
I’m really pleased with how it turned out. Mixing the new bricks in over the top 6 courses makes them stand out much less, and they add a bit of colour. I went for a chevron pattern rather than a random mix simply because I have never done a brick pattern before, but the pattern isn’t all that noticeable.
The worktops are slate paving and were only £17 from the Rockery Centre in Sandy. The slate looked great in the shop but when I put them on the BBQ they were light blue. After a thin coat of linseed oil it went nice and black.
I had expected the work to take a couple of days but somehow this contrived to take up most of the week. It’s good to have a little job that can be completely finished and look good. Also useful to straighten it out as I’ve been hosting a lot of BBQs this summer.