It is traditional for pub pianos to be way out of tune. Mine came with the pub and the keys played the note that the key to the left was supposed to play. A piano tuning app (Pano Tuner) showed what note was playing and with the hammers removed I tuned the strings plucking them like a guitar. YouTube was very helpful for piano fixing advice.
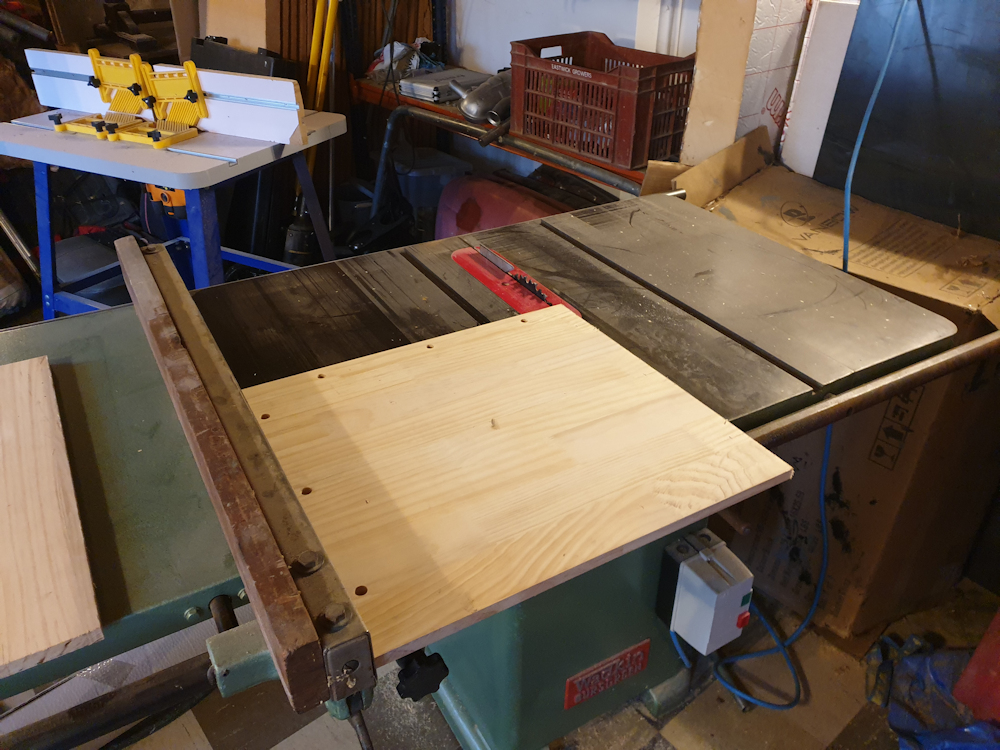
The curved keyboard lid was broken and for years I couldn’t think how to hold it while gluing it back together. The feather boards mounted on the router table turned out to be perfect for clamping the joint. The sticky keys were fixed by wobbling them from side to side.
It’s a Duck, Son and Pinker piano from Bath. It sounds nice now it’s in tune. I looked into the brand and their name plates always say “Duck Son and Pinker Bath and Bristol”. Mine doesn’t mention “Bath and Bristol”.
It’s a plain piano without panels or decoration. Can the internet tell me if that makes it an early piano or a late one? EDIT – from the serial number it looks like a 1911 model. Thanks Jonathan.
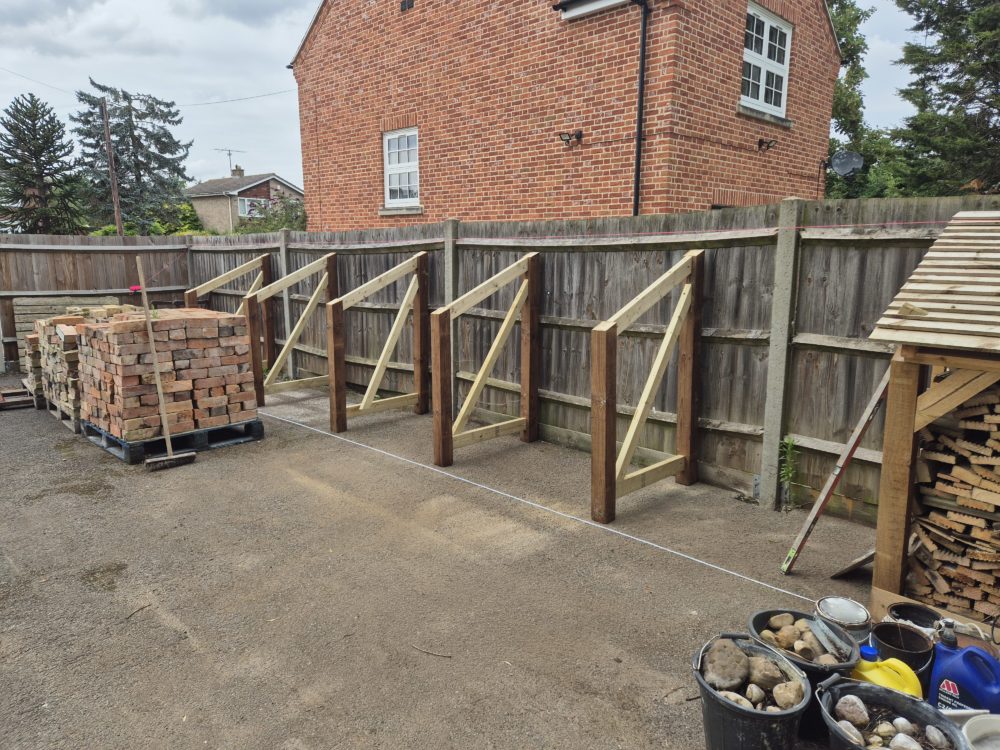
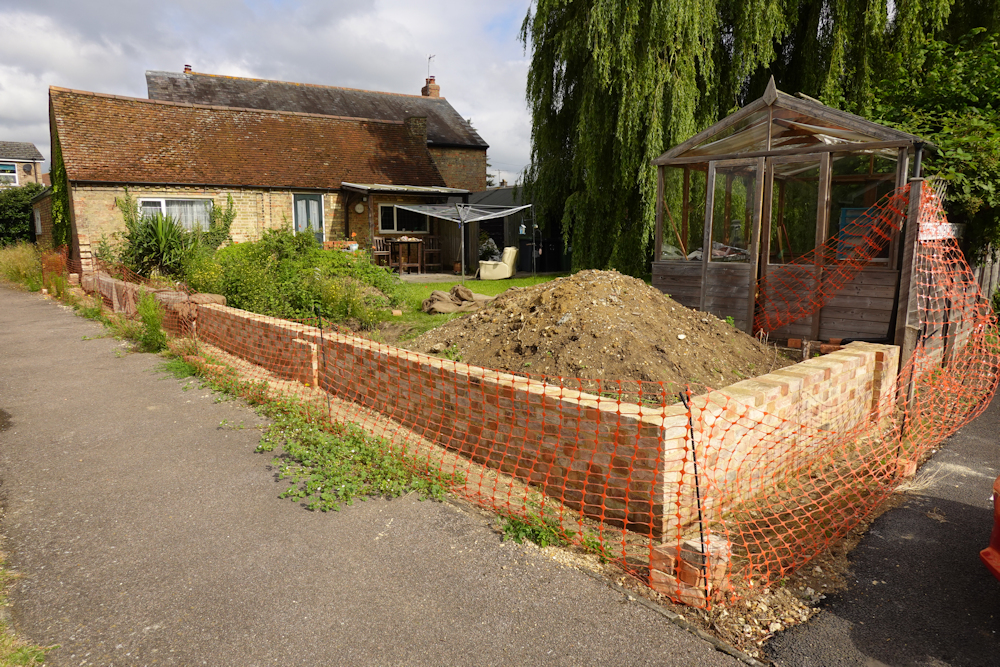
My yard has become untidy. I’ve been tidying for a few days and it’s better than it was. There are some building materials on there that will come in handy later on and the skip is for everything else.
Most of the building materials are on pallets so I’ve bought a pallet truck. My plan is to extend the wood store another 8m, call it a brick store, then tuck all the pallets underneath.
As usual I’ll update when something happens, but it’s been such a long time since the last post I feel I should bung something up here to show I’m still alive.
Here we go. I’ve started making the uprights and have come to the conclusion I don’t always plan things very well. It would only be another £150 of wood to go all the way to the gate and not have an odd empty space at the end.
The additional wood has been delivered and I’ve made two more uprights. With the uprights levelled and roughly positioned I can check levels with a string line to make sure it’s not going to look too wobbly. The driveway does curve but surprisingly by less than an inch.
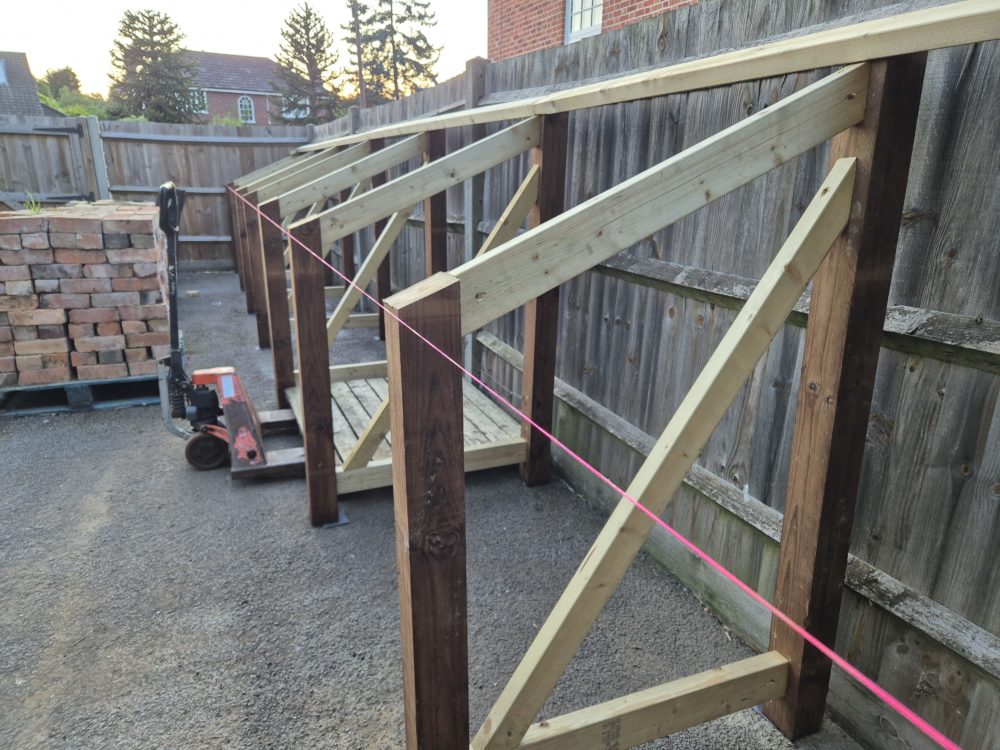
I thought about posting plans but all the dimensions are set to the space I have. The roof slope is 22.5 degrees. The height is set so once the rafters are added the feather edge boards will sit just above the top arris rail of the fence. The length of the extension is 9.77m which gives me a bay width of 1.29m. Just enough for a euro pallet.
The depth is 1m (same as a euro pallet) and that’s going to be tight as the fence posts stick out and I need 50mm for the doors so I might need to shuffle it slightly away from the fence.
The next day the rafters went on. They sit slightly higher on the fence than expected because I shuffled the brick store away from the fence without thinking about the angle of the roof, but fortunately the roof will still be lower than the fence.
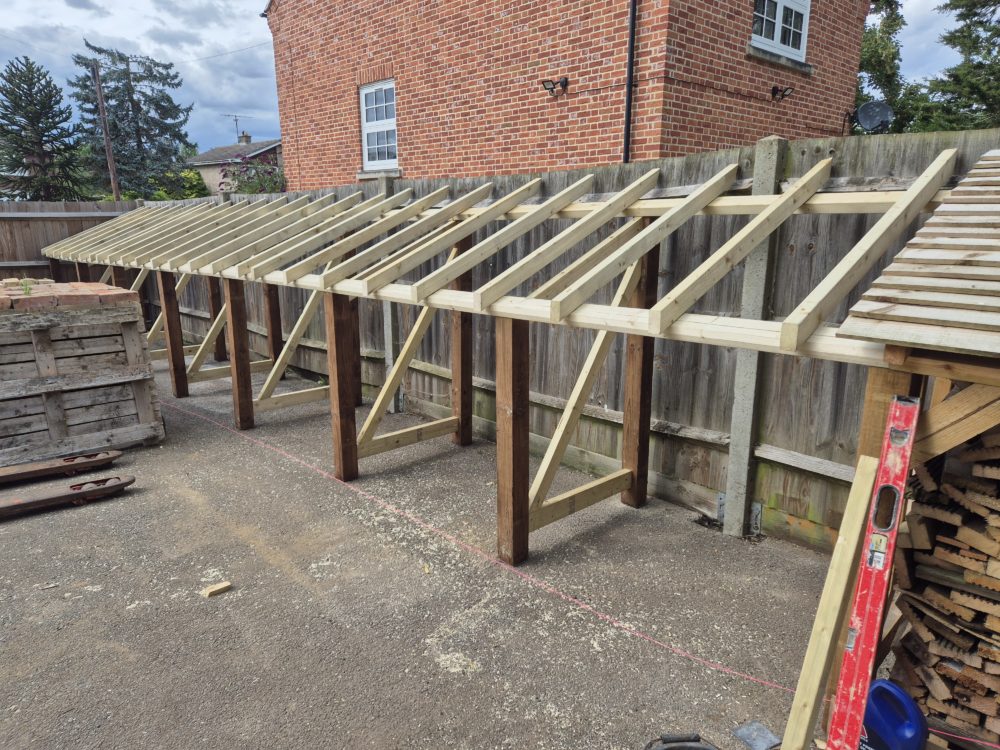
And finished (apart from 4 bits of feather edge).
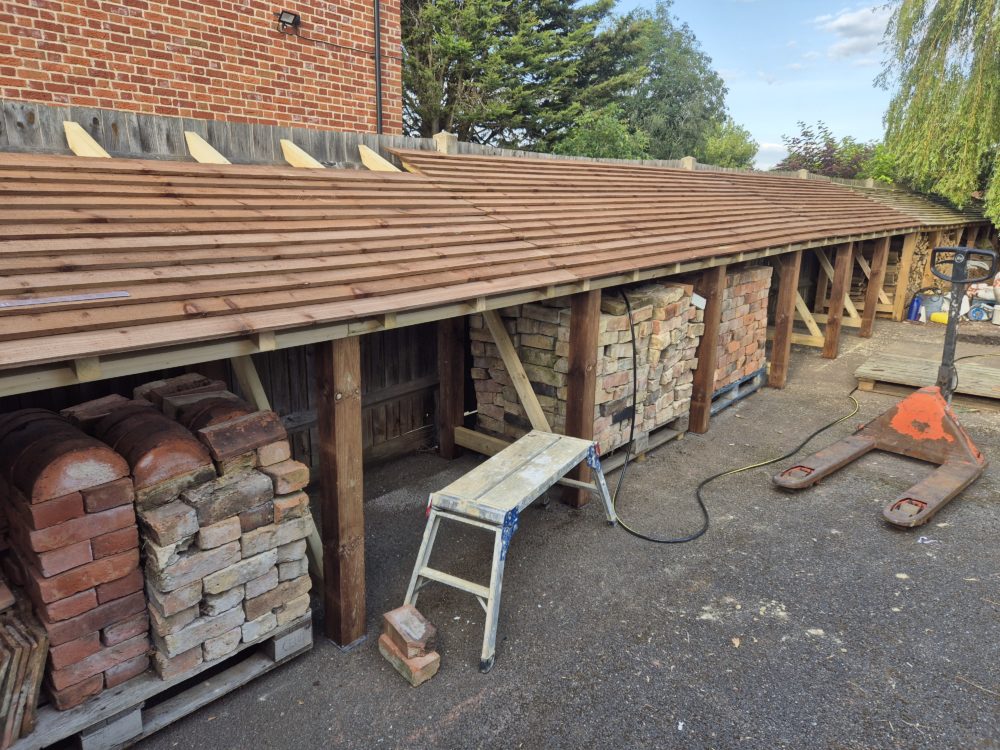
The bricks look a lot more tidy than they did in the first photo. I had been considering adding doors but the posts aren’t fixed at the bottom and are sitting on slippery bits of slate so they won’t be able to support doors. That’s going to be something to think about later.
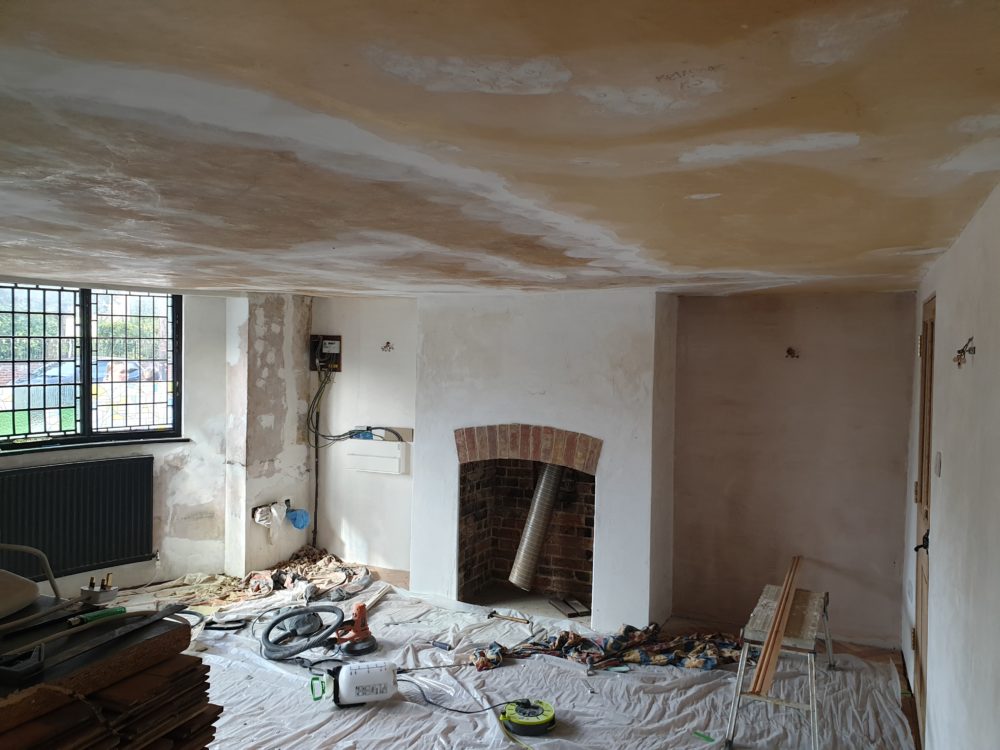
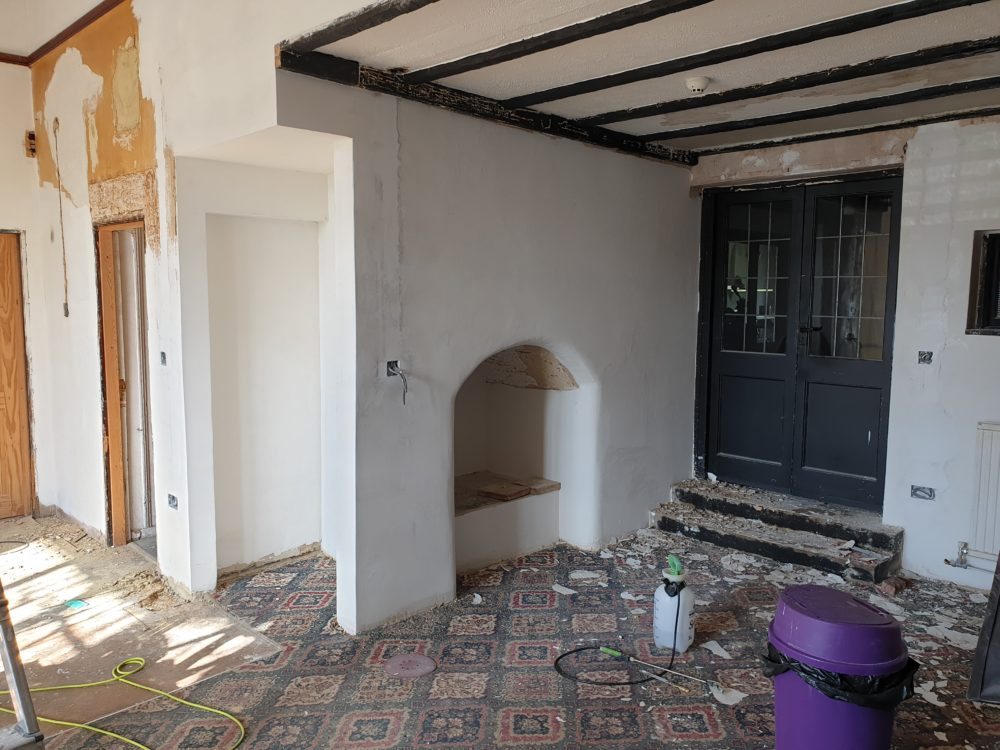
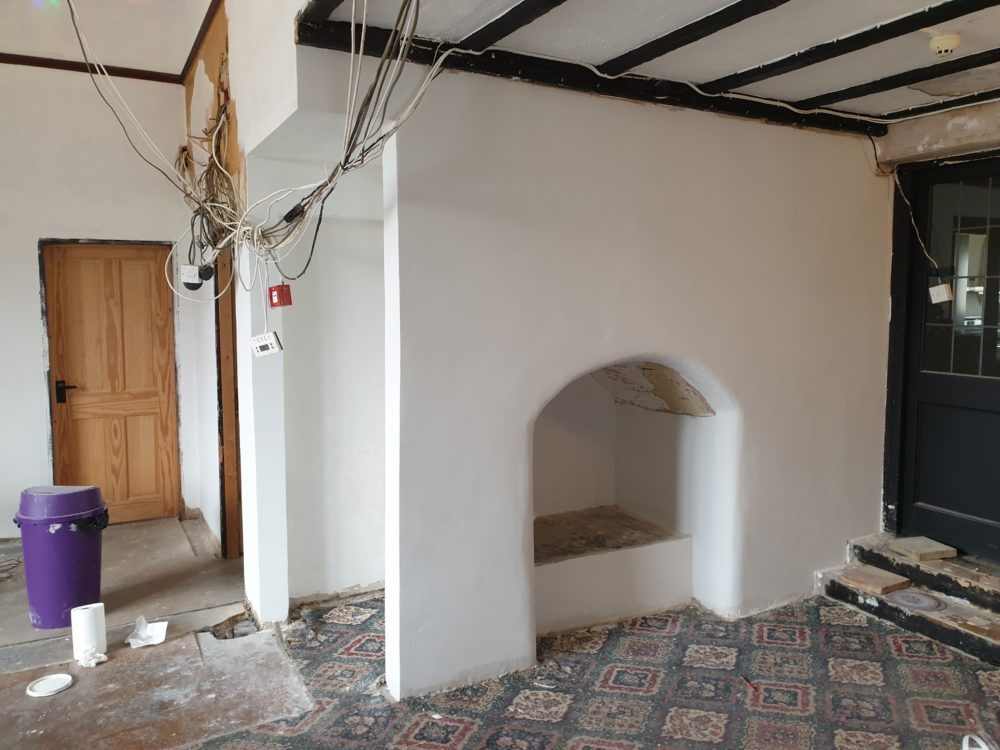
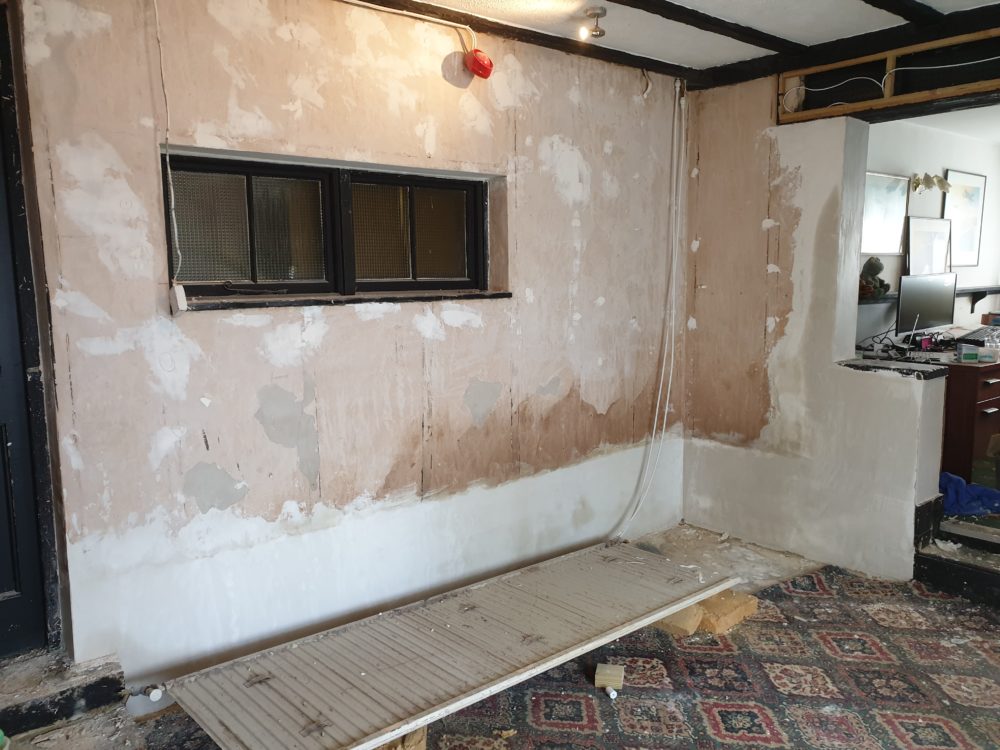
The floor in the ballroom will take ages to lay so I’ve moved onto the snug. I’m keen to get the snug finished before winter as it’s a small room that will have a wood burner and it’s going to be toasty in there.
There’s not much to do. The old consumer unit has been removed, the wallpaper behind stripped, and the big hole in the ceiling where the wires went repaired with lime and lath. The snug has had a fair bit of work already. The ancient ceiling is cracked and I’m adding a little filler before lining paper.
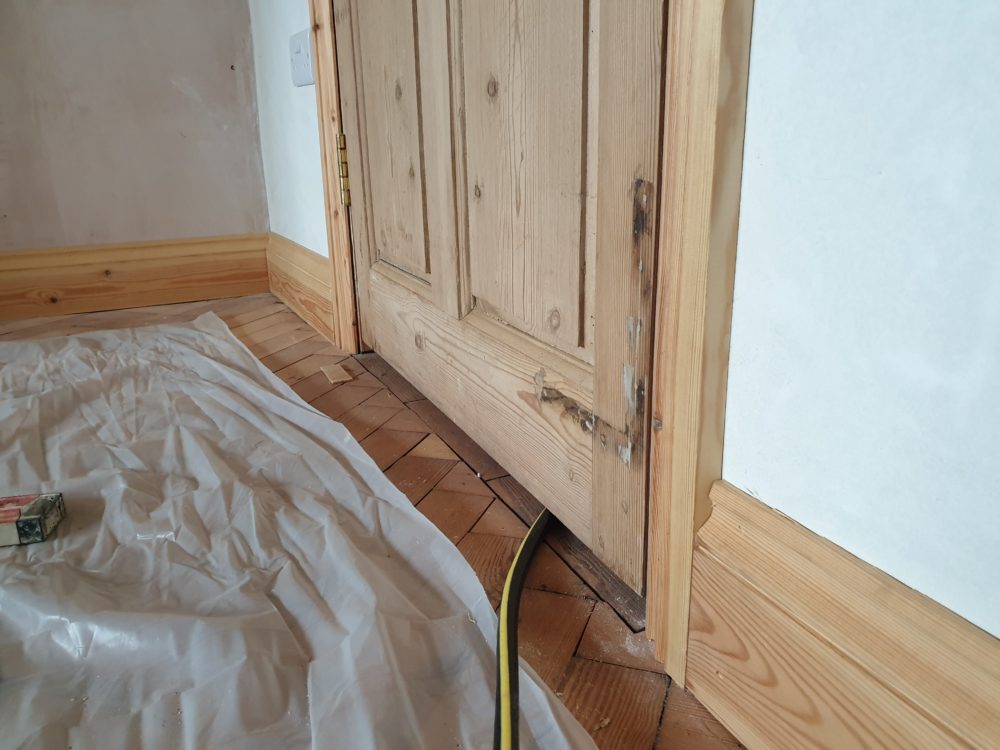
I’ve started fitting the architrave and skirting and it’s making the snug look much more like a room. The walls are nice and flat because they were skimmed.
The walls are wattle and daub and are no good for mechanical fixings so I’m fitting the skirting the modern way with grab adhesive. It seems to dry soft and chalky so the boards can be removed again without damaging the plaster too much.
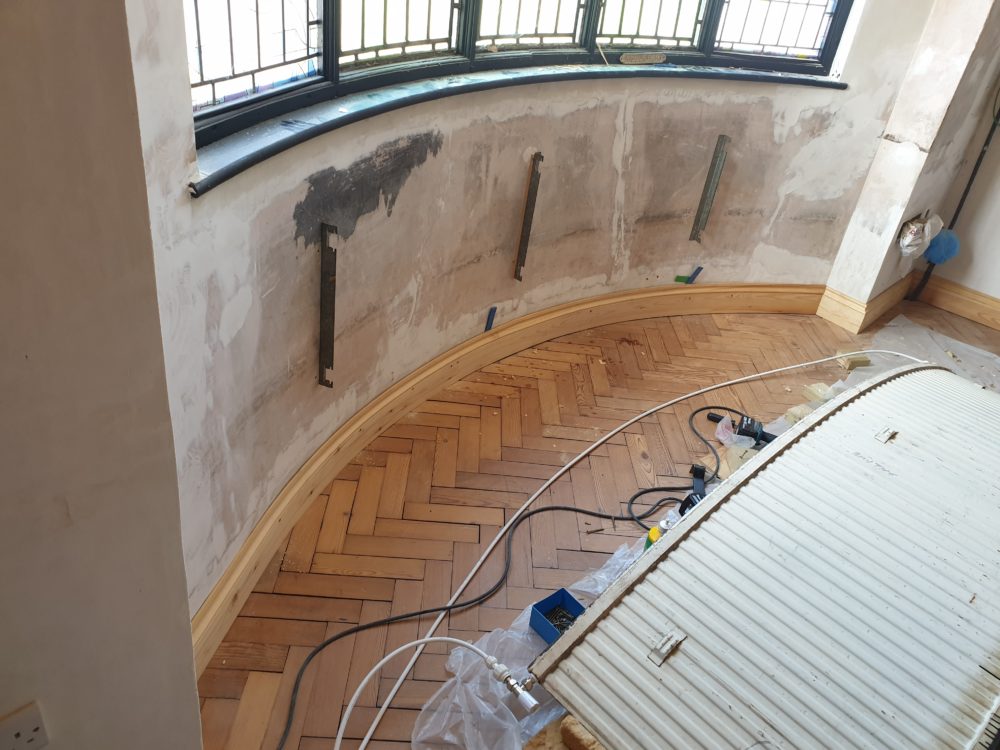
The skirting board in the curved bay was a pain. I cut deep slots on the rear spaced 1/2 inch apart to make the skirting easier to bend. It was very much a two person job to fit (I broke the skirting on my first attempt and had to prepare a second board). My neighbour came over to help press the board into position while I screwed it to the wall.
It almost worked but the moulding at the top split in three places. I’ve glued it back together and it should be OK with a little filler.
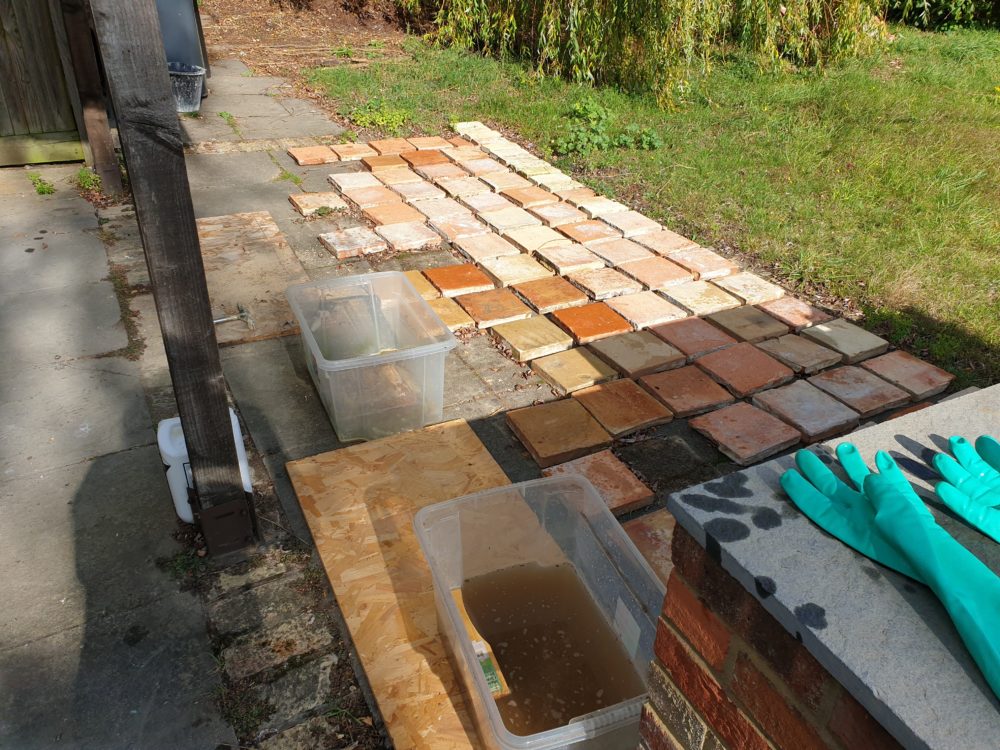
Outside I have a lot of reclaimed pamment tiles which have cement staining. The cement is coming off well with brick acid. I want to use the tiles in the snug hearth and in the ballroom cubby. Maybe also for some steps if there are enough good ones.
It’s a job I ought to have started some time ago as it’s easy to go and move a tile from the acid tub into the water tub every now and again while I’m doing something else. It’s less time efficient when the hearth is the next job on the list.
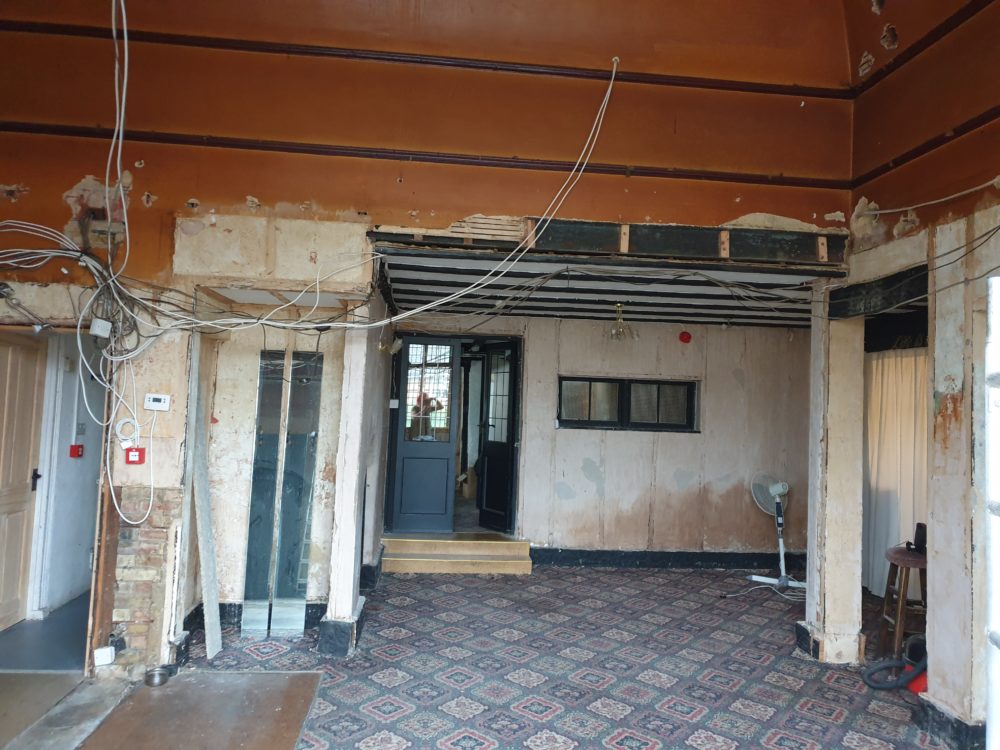
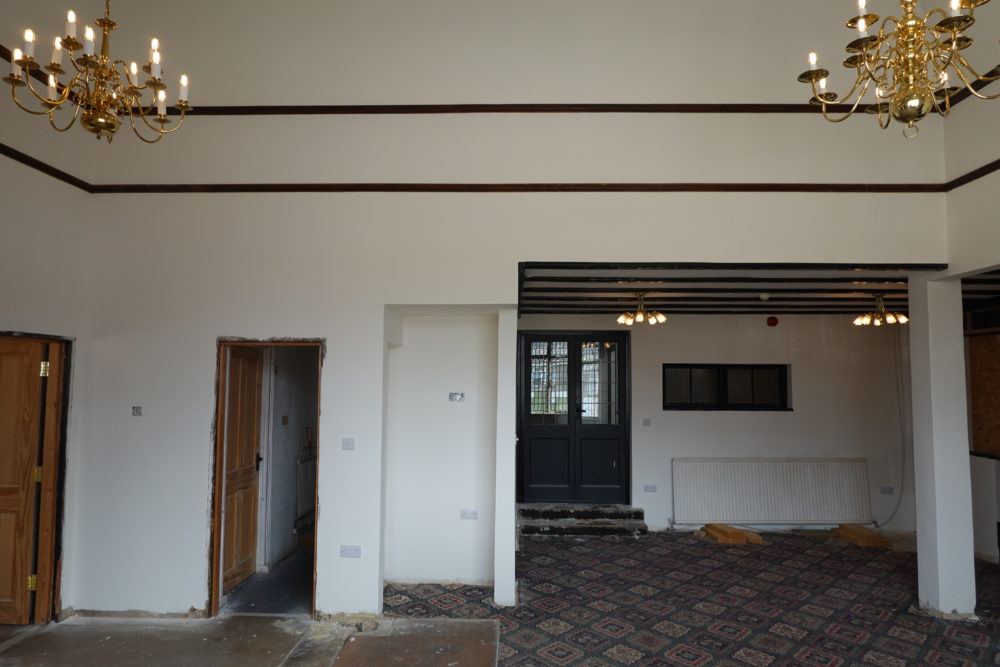
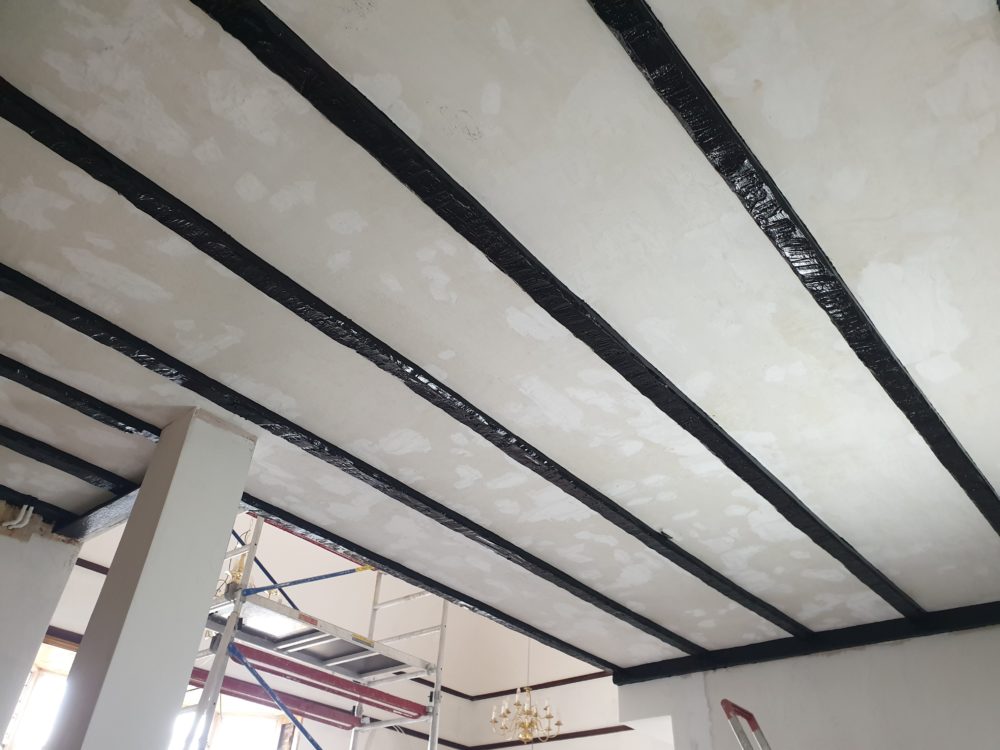
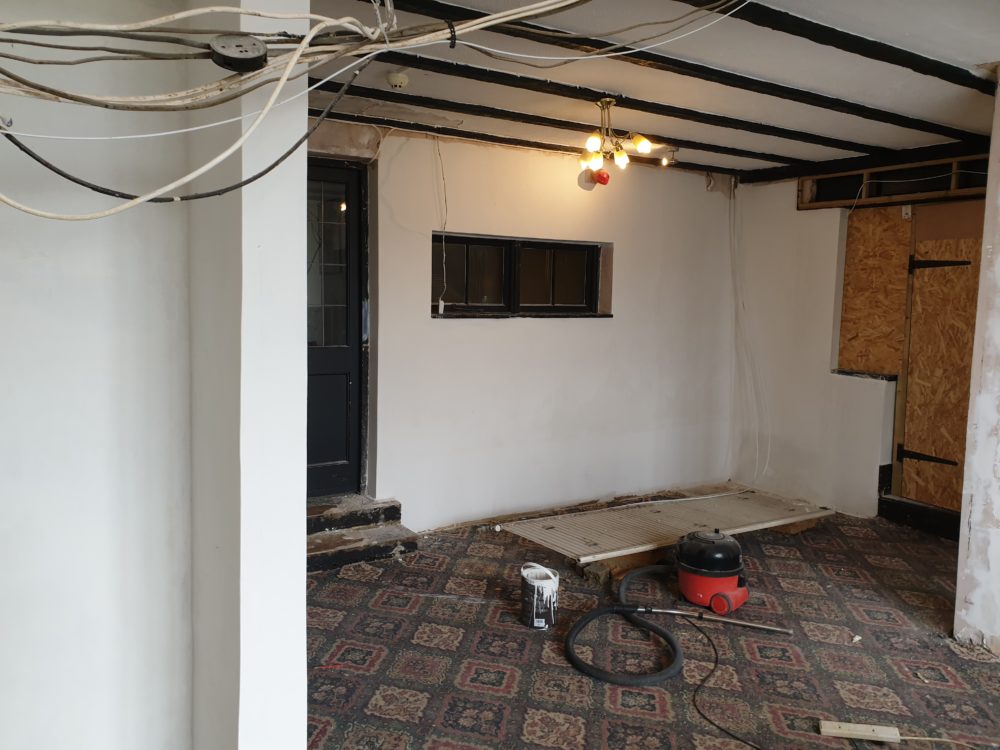
The wall and ceiling decoration is finished in the ballroom. Here’s a before photo looking from the ballroom into the secondary room after the false ceiling was removed. (Here’s an even more before photo).
And the after photo. See – I have been doing something. Both of the wooden strips in the ceiling are picture rails which will open up some more decoration opportunities.
There is still plenty to do. The cubby in the middle of the photo above will get cupboard doors. Architrave, skirting and plumbing have to wait until the floor is finished.
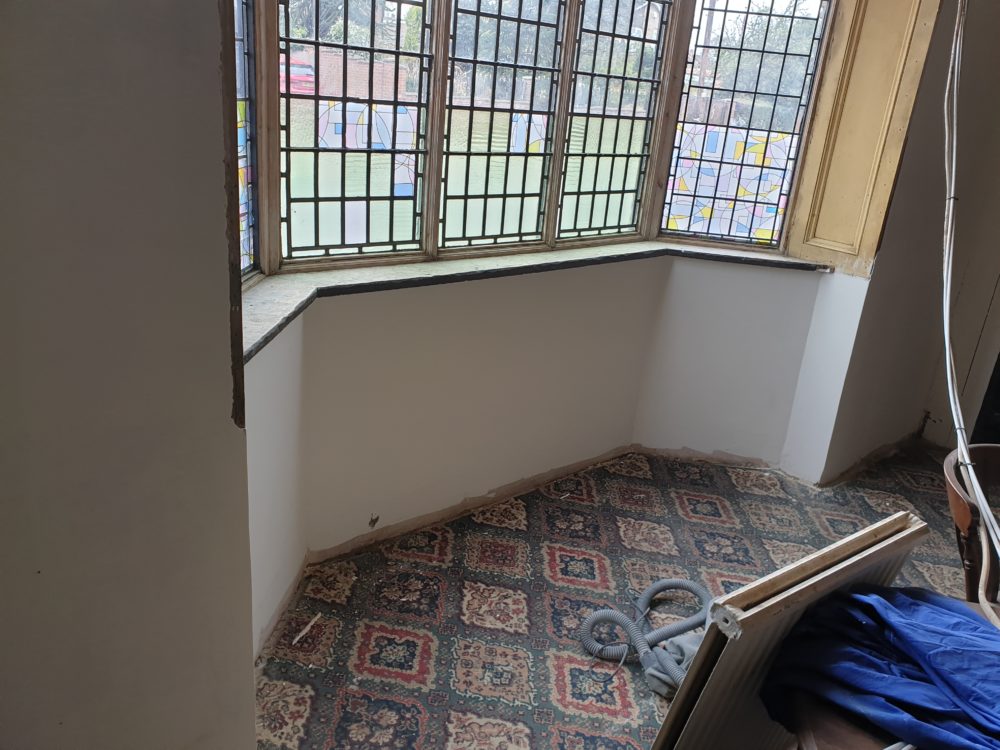
In the other direction the window and vestibule aren’t quite finished. But it’s good enough so I’m going to try to get the snug finished before hopefully laying the ballroom floor over winter.
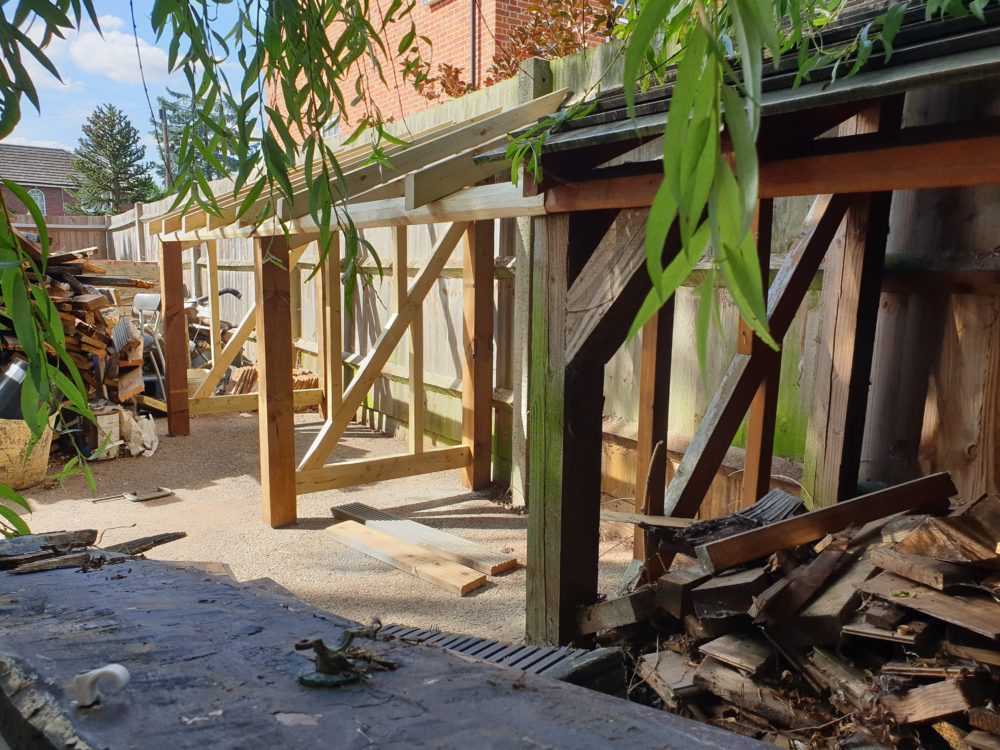
I was given a whole load of wood and I don’t have enough room for all of it in the wood store. Fortunately when I built the wood store I designed it to be easily extendable because I wasn’t sure if it would be big enough for the wood I had at the time.
I’m adding a couple more bays. If I attach doors later the extra bays could become a little shed for storing things like the cement mixer once the wood has gone.
I’ll get a skip shortly. I’ll store rubbish until there is enough for a skip and moving it to make room for the extension was exhausting.
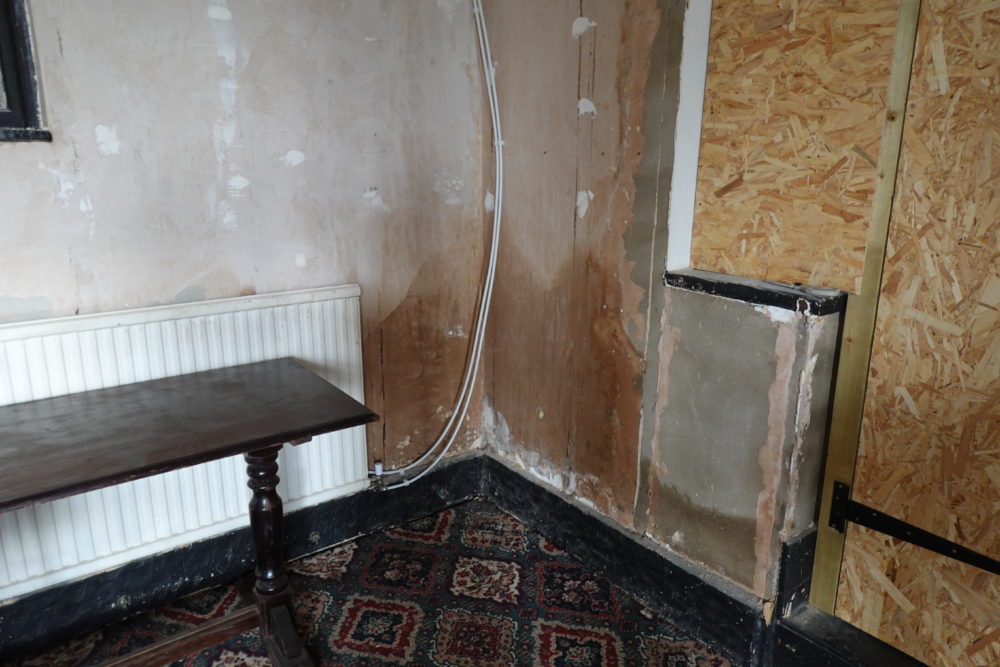
The first fix electrics are done and the channels filled in ready for paint. I want to paint the walls before fitting the switches and sockets and there’s not so much more tidying to do before I can paint.
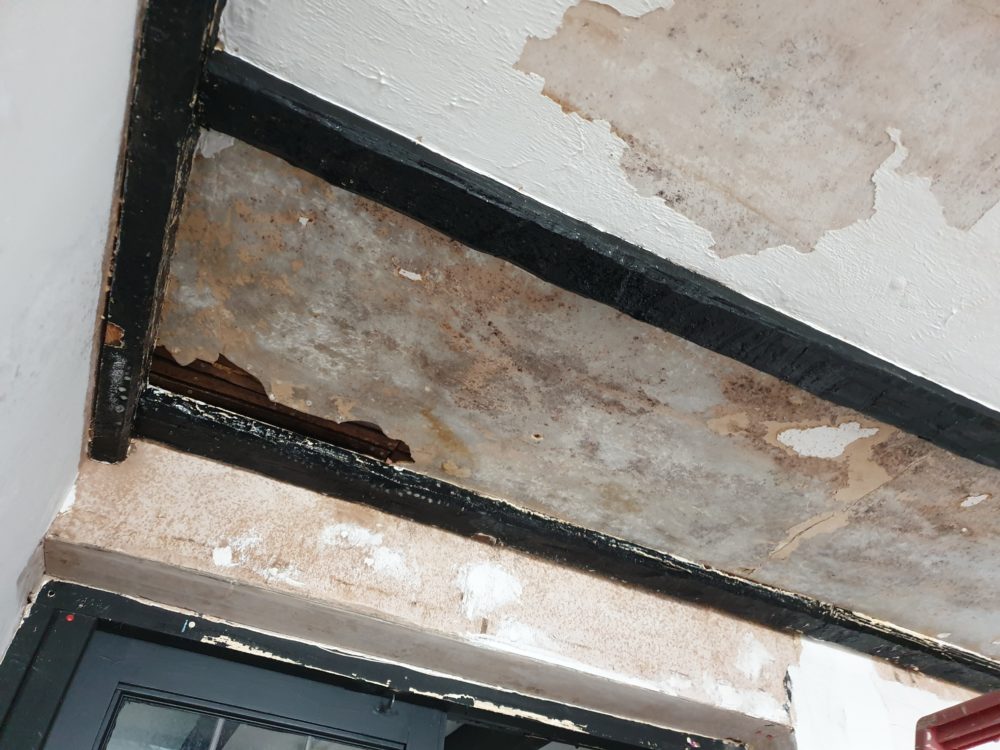
I’ve been putting off the ceiling. It is in lime on lath with lining paper which is the perfect way to do it. Unfortunately it has gloss paint and textured paint on top and is waterproof so I can’t remove the lining paper to get back to the lime.
A fair bit of the lining paper fell off after the burst pipe. The rest just won’t budge. The missing plaster in the corner was missing the lath so a deliberate hole for some reason. I’ve put some lath back in.
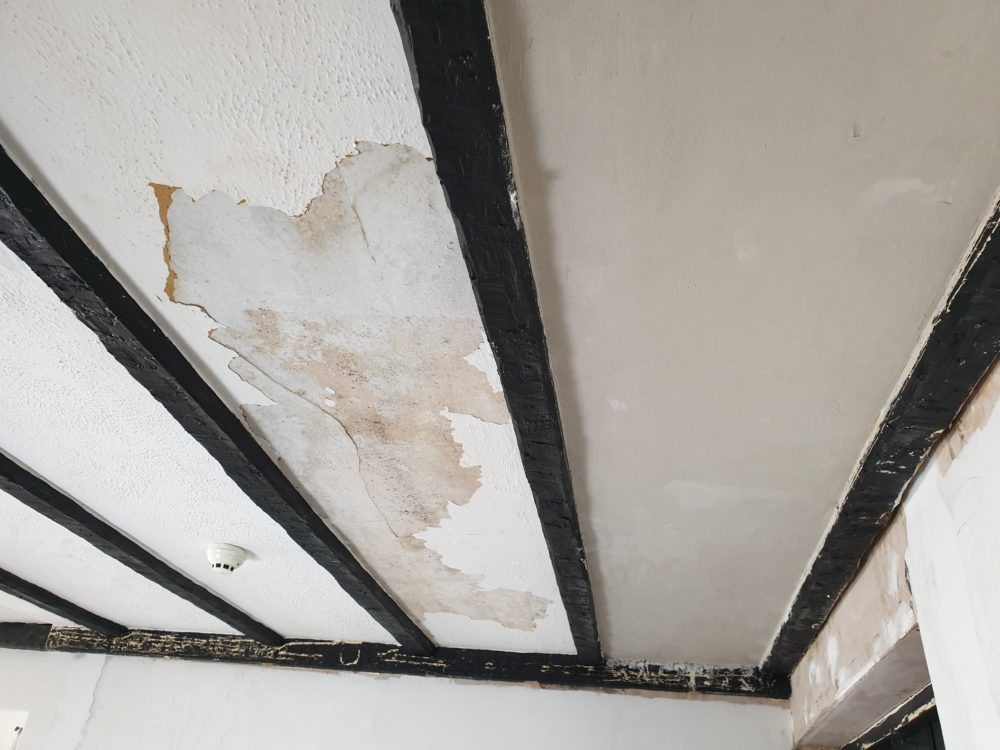
I’m doing a bodge and skimming over everything. I’m using Ecomortar R50 lime mortar which sticks well to stuff lime doesn’t normally stick to. I think it will work fine.
I don’t plaster often enough to remember how to do it. I got the mix just right – firm but sticky. I forgot the timing and did the finishing too late but it worked out OK with a bit of water spraying. Now I’m getting the hang of it the remaining ceiling should be done in a couple of days with a rest in the middle for sore arms.
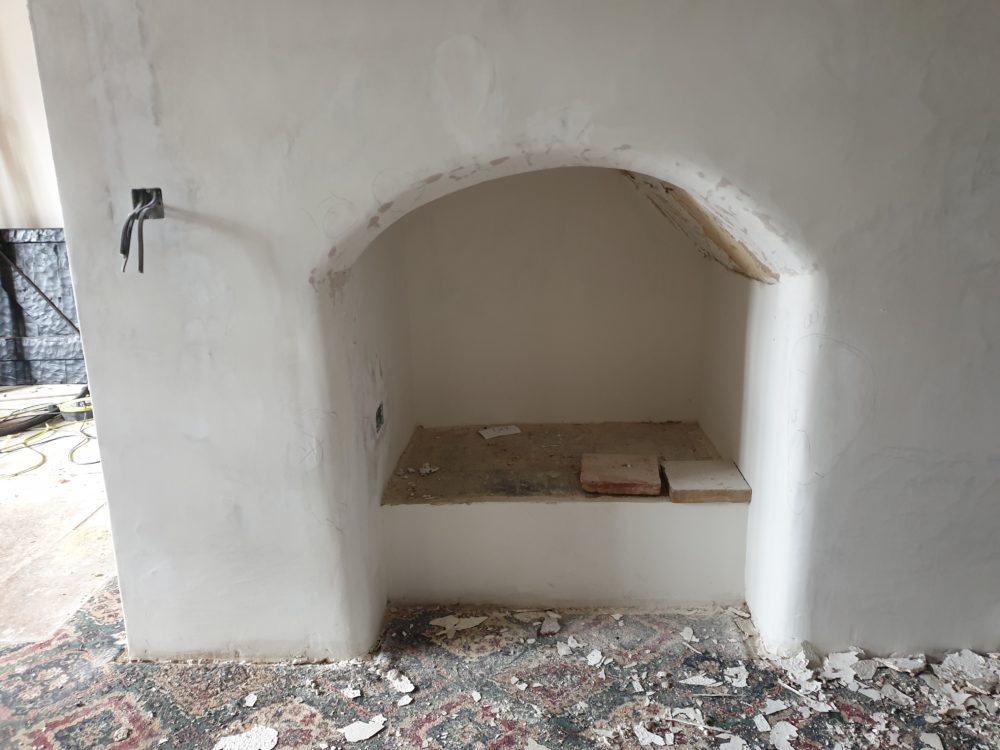
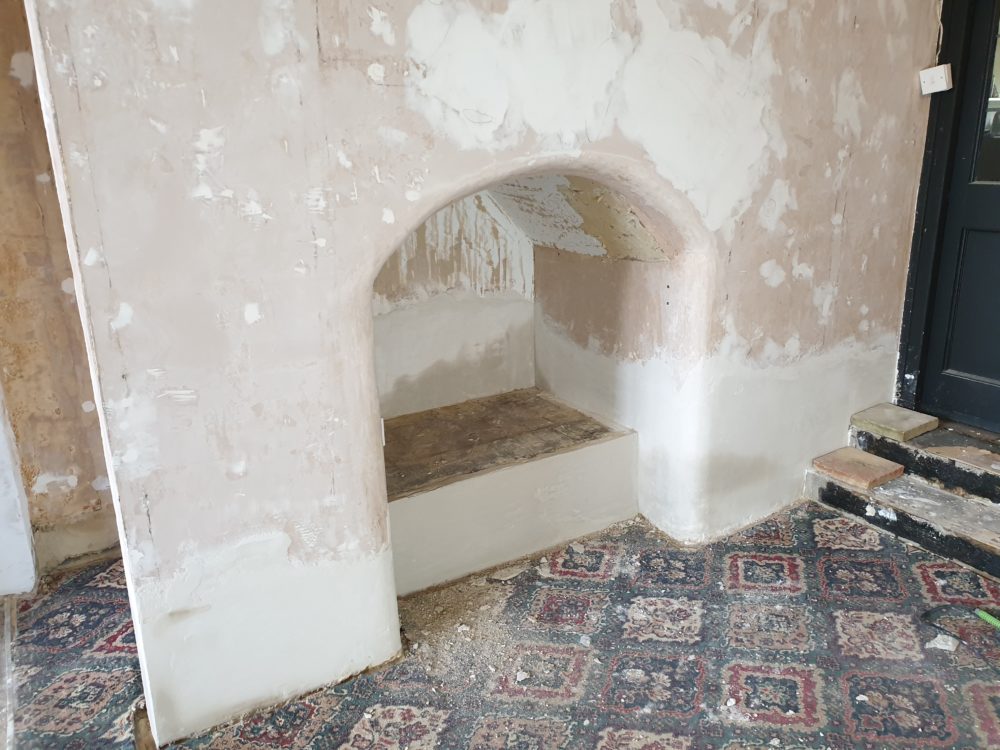
While resting I’ve been fussing about the wall with the arch. It is side lit by the window so you can see the crookedness. I’ve figured out what it is for. It’s not a chimney as it’s under some stairs built at the same time.
It was originally part of a lean-to and there were bull-nose bricks on the base. I think those were to make it easier to push barrels on top and this was where the beer was dispensed. This area was the bar after 1920 and I suspect the lean-to was open to the main room and acted as the bar before 1920.
The ceiling plaster is finished and I’ve started painting the woodwork. It took all day to re-paint the mock tudor ceiling beams. 50m of edges done at a snail’s pace.
The linseed paint should dry to a satin matt finish but it will take many days to dry. By then I should be ready to paint everything else.
Most things now have the first coat of paint. I’ve plastered the ceiling in the cubby under the stairs and the last thing is the entrance vestibule.
Outside was easy – scraping off any loose paint and sanding the edges smooth seems to be working. Inside the thick textured paint has shrunk and cracked. I’ve found I can get the walls smooth with a paint scraper and am planning to paper over the cracks with lining paper. But I’ll do that when I decorate the snug where I will be using use lining paper to protect the lime from inappropriate paints.
With that I’m done posting about decorating. I’m sure to do a before and after once I’ve finished.
I’ve been struggling to find an electrician to complete the rewire post apocalypse. The electrician who did the first half is far too busy and others want over £10K to finish the job. Fortunately it’s just a case of extending the new circuits and I can do that myself within the rules. I’ll be much slower than an electrician but I can’t see it taking me more than 3 weeks and £10K is a good rate for me.
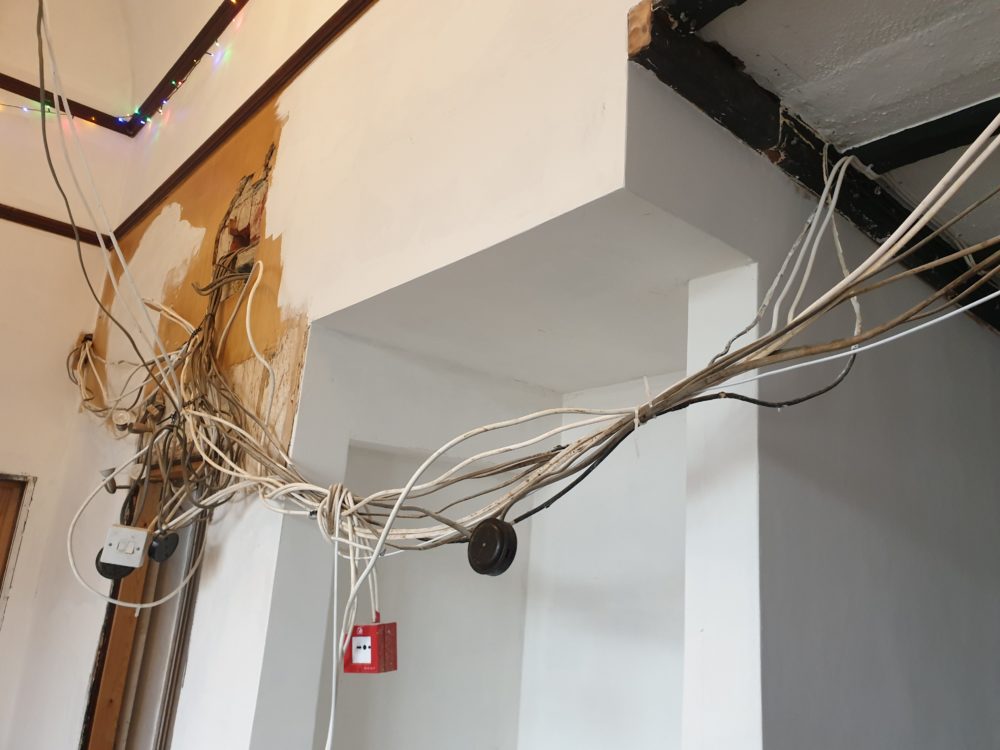
Pubs have funny electrics. Aside from all the surface mounted wiring there was an 18 gang switch panel that controlled many of the lights. It was really annoying if you wanted to go to the loo but forgot to turn the light on first. Removing the switch panel and attendant wires got rid of the rest of the dangling wires in an instant.
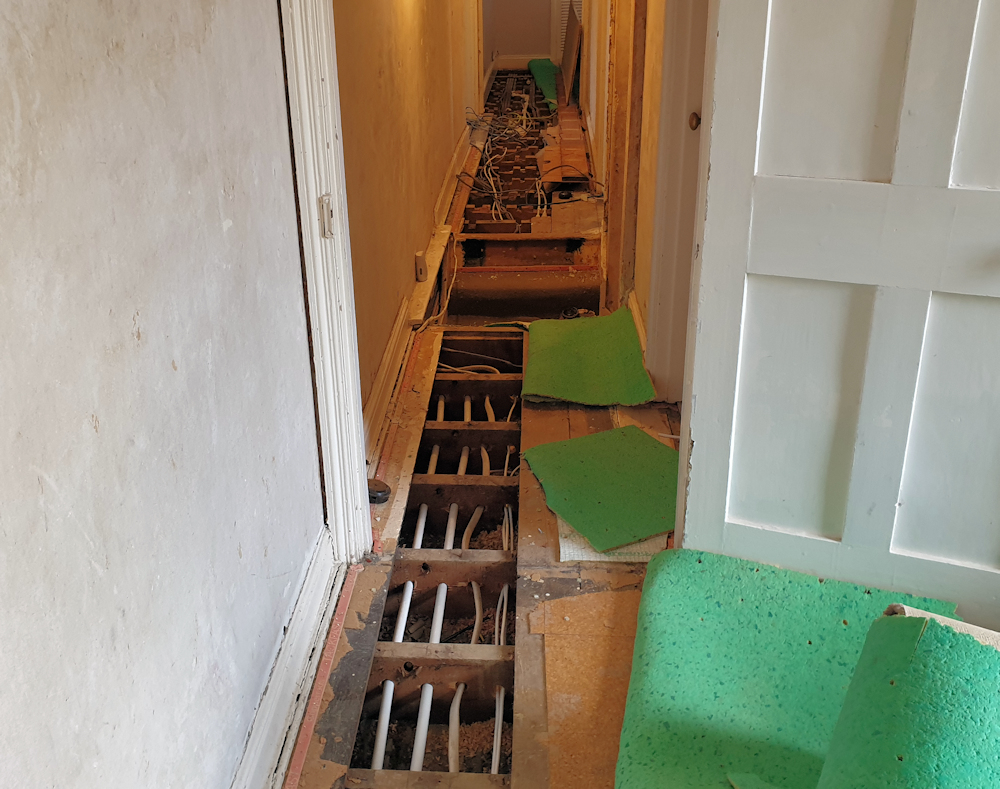
I’ve lifted the floorboards upstairs where the wiring runs apart from in my bedroom in the attic which is full of junk removed from the eaves cupboards to allow access to the loft space.
I’m starting by removing all the old wires. All of the wires have been disconnected from the old consumer unit and pulled out apart from the upstairs lighting circuit which is useful for now. I’ve run a couple of extension leads where I missed having some electricity.
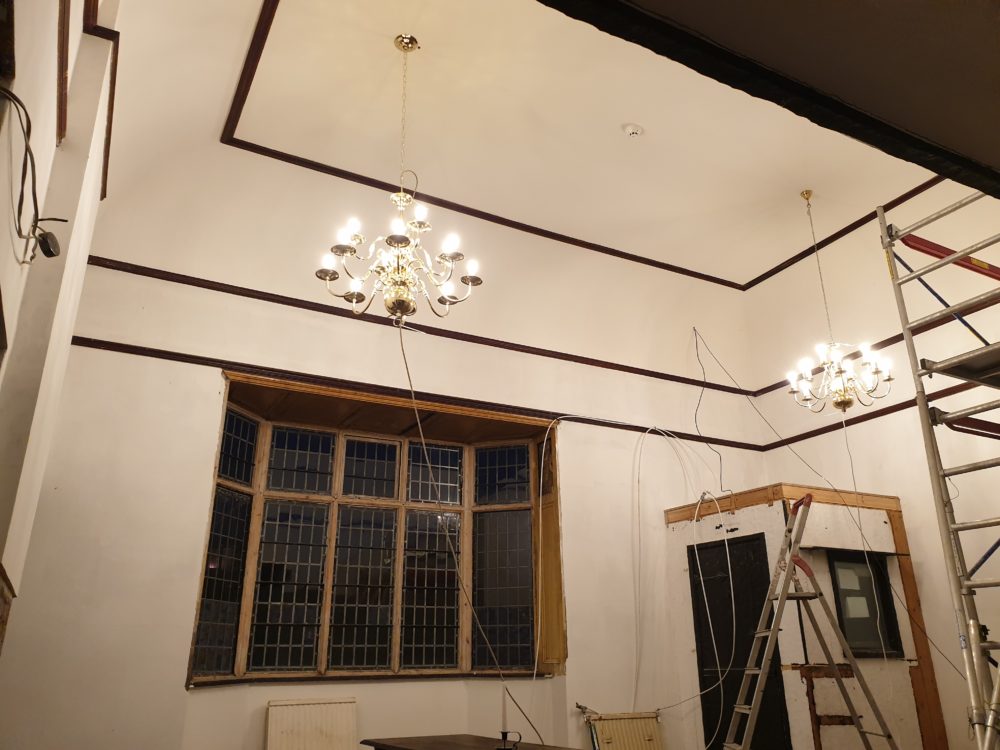
I put the second coat of paint on the ceiling and trial fitted the chandeliers in order to figure out where the wires should go. It took more than a day to figure out the position and I set them at 1/4 and 3/4 of the room length. Now I think they are too far apart.
I bought some bulbs and connected the lights up to an extension lead and the spacing seems much better.
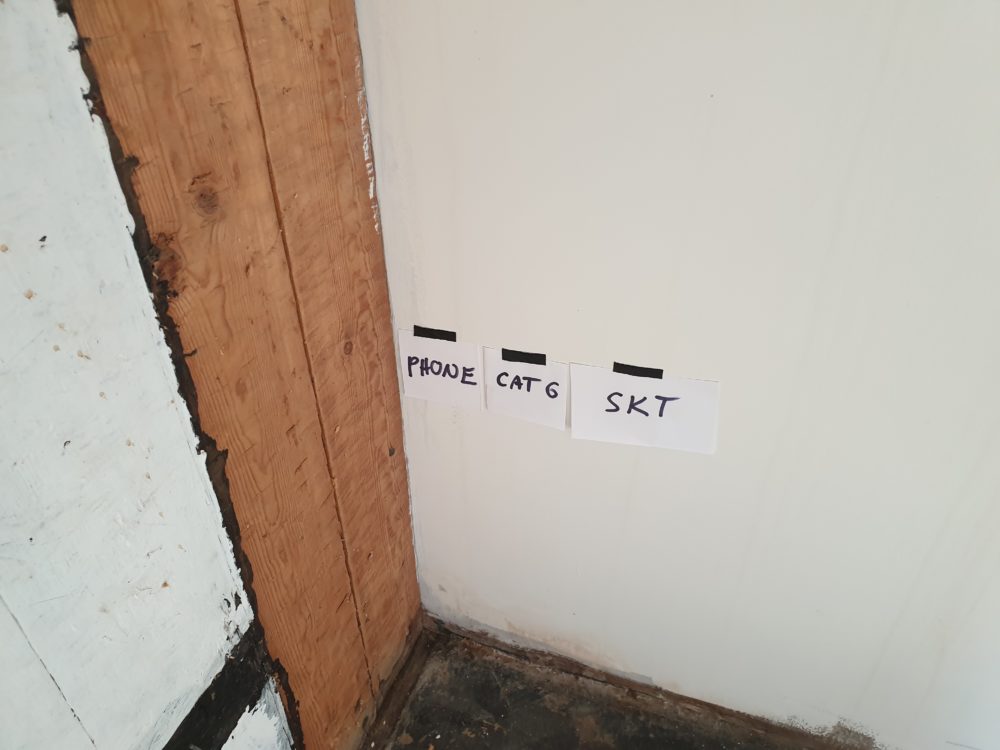
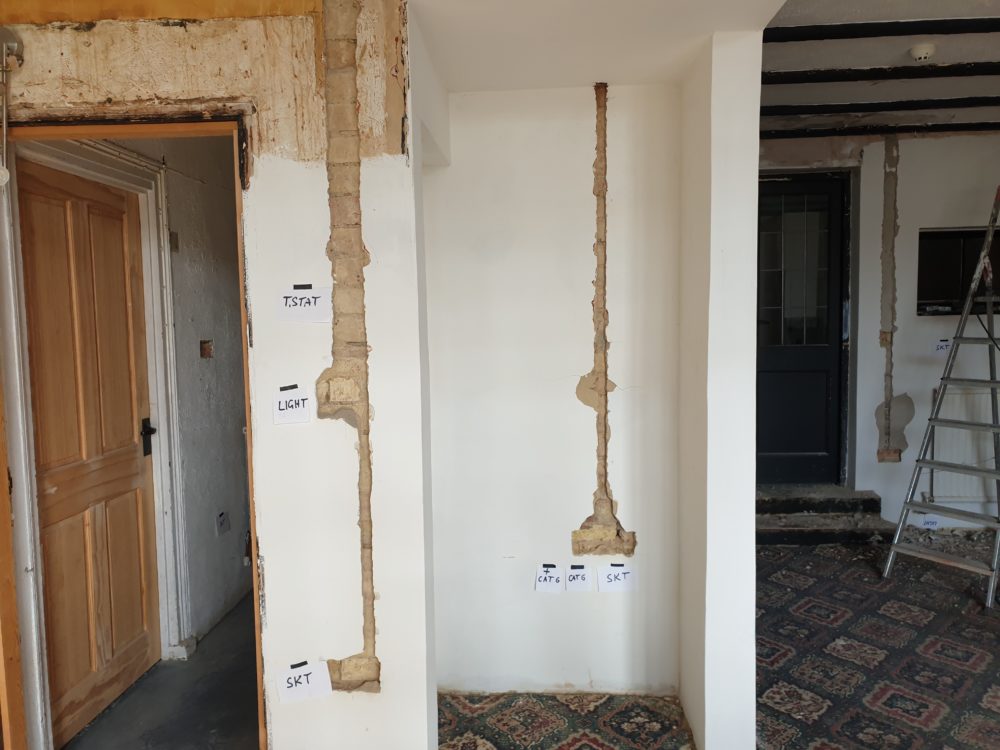
I slowed down a bit and realised it was because I didn’t have a plan. Now the house is covered with bits of paper taped to the walls representing the position of light switches and sockets.
It’s been a really useful exercise to visualise the positions of sockets and switches. I can count them up and order them and have a chance to move them around if the position isn’t quite right before I install them.
Now I understand why the electricians didn’t want to do the job. I’ve got non-standard construction. I’ve been chasing out the walls for the wiring and sockets. The walls in the photo are brick and easy enough.
Other walls are being a pain. Two sides of the main room are timber framed with wattle and daub and were plastered in the 1970s with cement on a wire mesh mounted on batons. I’ll need to get creative with those walls.
It took a long time to do the first fix. I kept making mistakes like not counting the number of wires I would need and having to chase the walls a little more. A lot of time was spent learning how to do the job.
Now the first fix is finished I’ll plaster up the chasing and finish off the rest of the wall that has become accessible after removing the old wires. I want to finish the painting before installing the new sockets and switches.
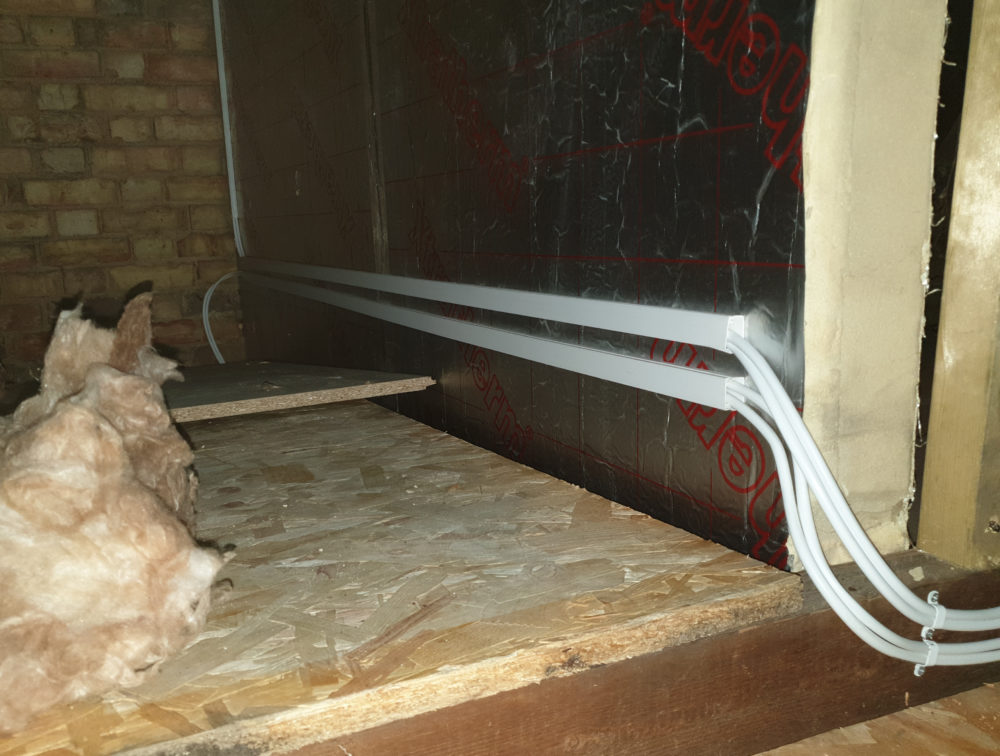
Being an old pub a lot of the wires were surface mounted making decoration difficult. Many of the wires ran above the false ceiling that was removed and now dangle in a rats nest of electrical wires and fire alarm cables.
I’m planning to start with the fire alarm system as that comprises half of my dangly wires and I’ve mostly figured out the routing. It’s a good system that was very neatly surface mounted. I want to hide the wires in the floor voids.
The fire alarm cables are fire resistant. That makes a lot of sense as the only time a fire alarm needs to work is when the house is on fire.
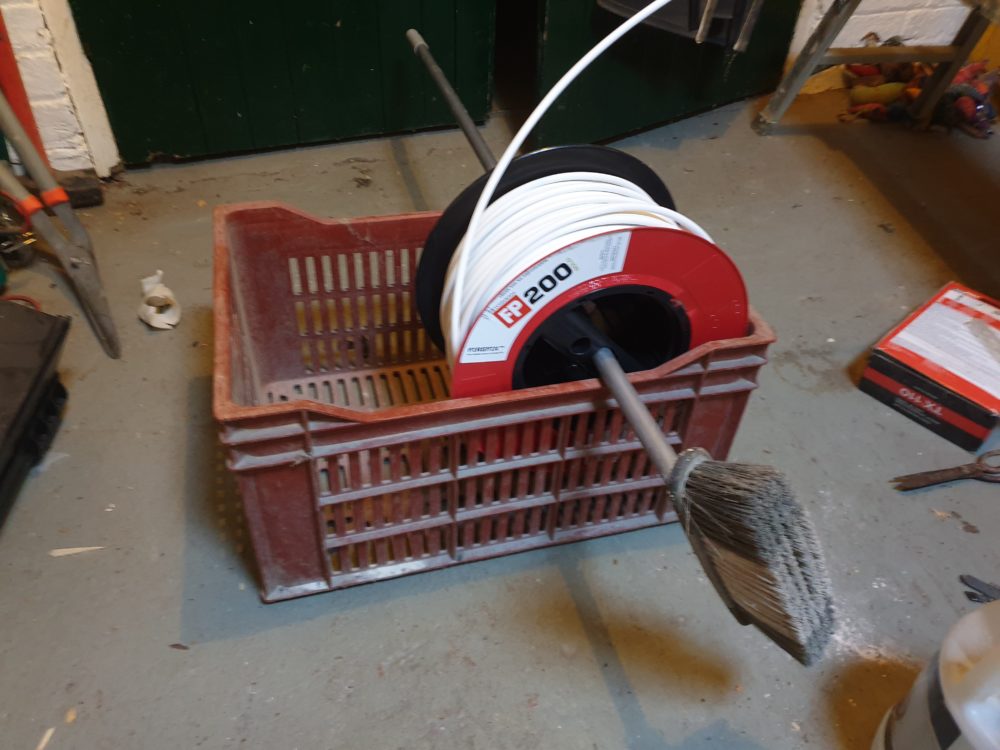
Fire resistant cable is expensive but I saved money on the cable dispenser. It worked really well. I rejected replacing the mains powered system with a wireless alarm because it’s only 10 years old and there is nothing more annoying than having sensors beep at you when the batteries run out.
I might struggle to say anything interesting about moving wires from one place to another. With the house divided in two by the double height room and staircase the cables for both upstairs and downstairs alarm zones will have to go over the attic ceiling. That might be an angle.
I have lifted the insulation and put some temporary boarding in the loft space to make crawling around more comfortable. I’m using trunking in the loft to keep the wires tidy and away from the rockwool insulation. (This turns out to be bad – the cables should be clipped with metal clips throughout. It’s all in a secret British Standard I don’t want to pay for.) Where I can’t do that the wires are screwed to a support above the joists to avoid being completely surrounded by insulation.
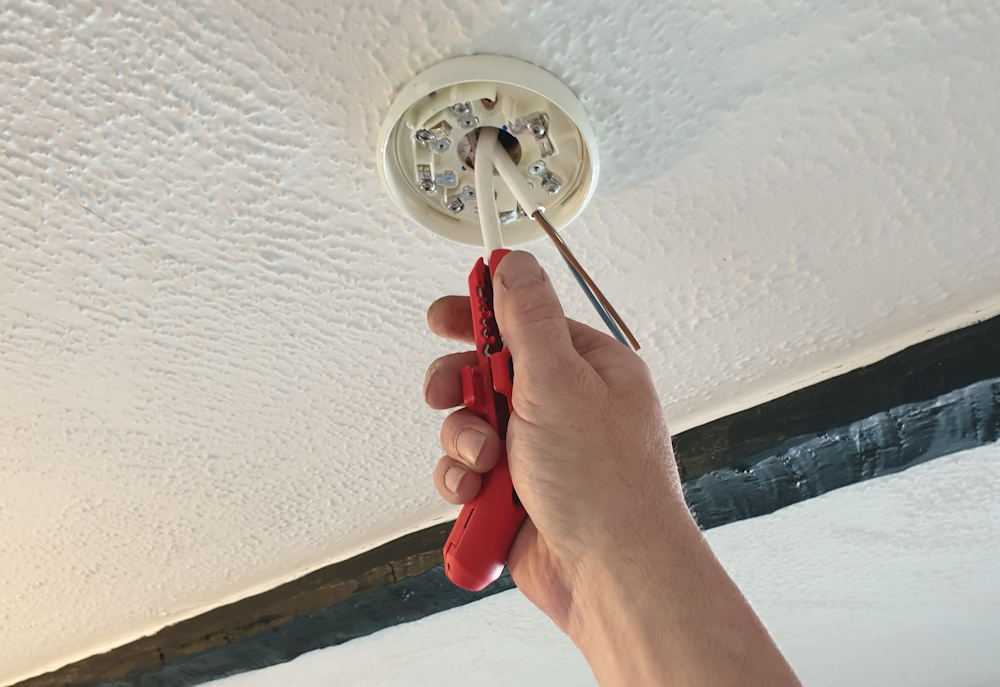
I’ve made it to first fix. The dangling wires in the first photo are much reduced and I’m tidying up the plaster before re-fitting the sounders and detectors.
The outer sheathing on fire alarm cable is very tough and I damaged the inner wire sheathing the first time I tried to strip it off. I’ve bought a Knipex Ergostrip stripper which was expensive for a bit of plastic but it works brilliantly on round cables and has more than paid for itself.
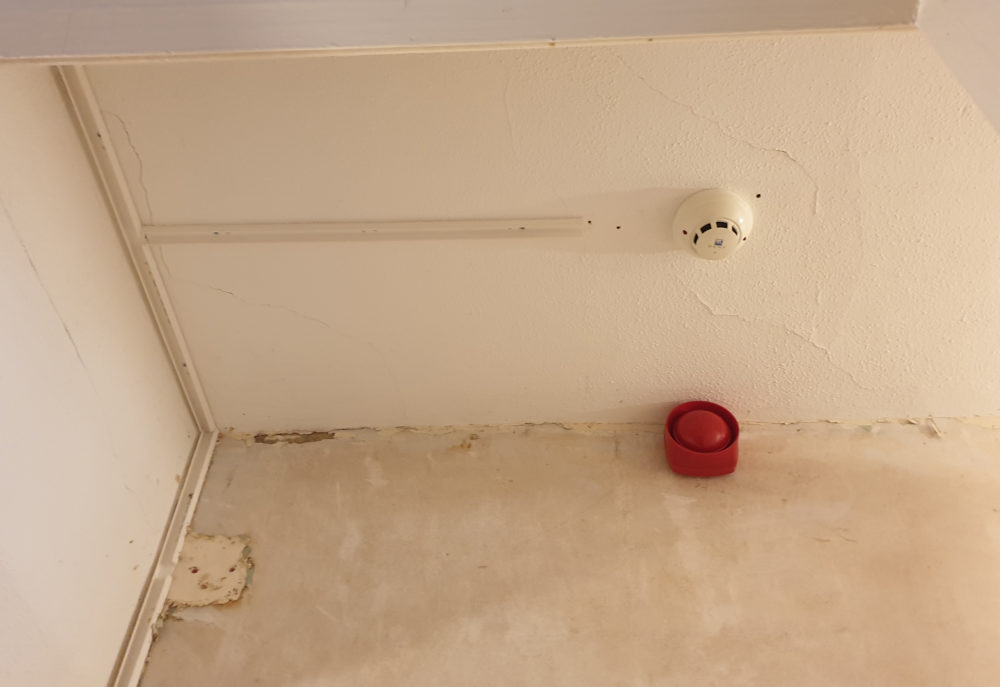
The detectors and sirens are mostly fitted. I haven’t removed the ugly old surface mounted trunking from the upstairs corridor yet. I moved the sensor in the photo a little because symmetry is important as is joist location. Fire alarms are a bit ugly but surface mounted wiring is worse.
Once everything was finished I checked the wiring for faults then switched the system on and then tested it some more. It works!
The downstairs has been looking dreary in bare plaster with lots of patching for nearly 3 years. After 3 days of filling most of it now has the first coat of paint. It’ll get the second coat done once the electrics are finished.
I’m using Earthborn clay paint because it’s breathable. It’s also expensive but should cover the walls in 2 coats which will save a lot of time. I’ve not finished yet as I ran out of paint but already the room is transformed.
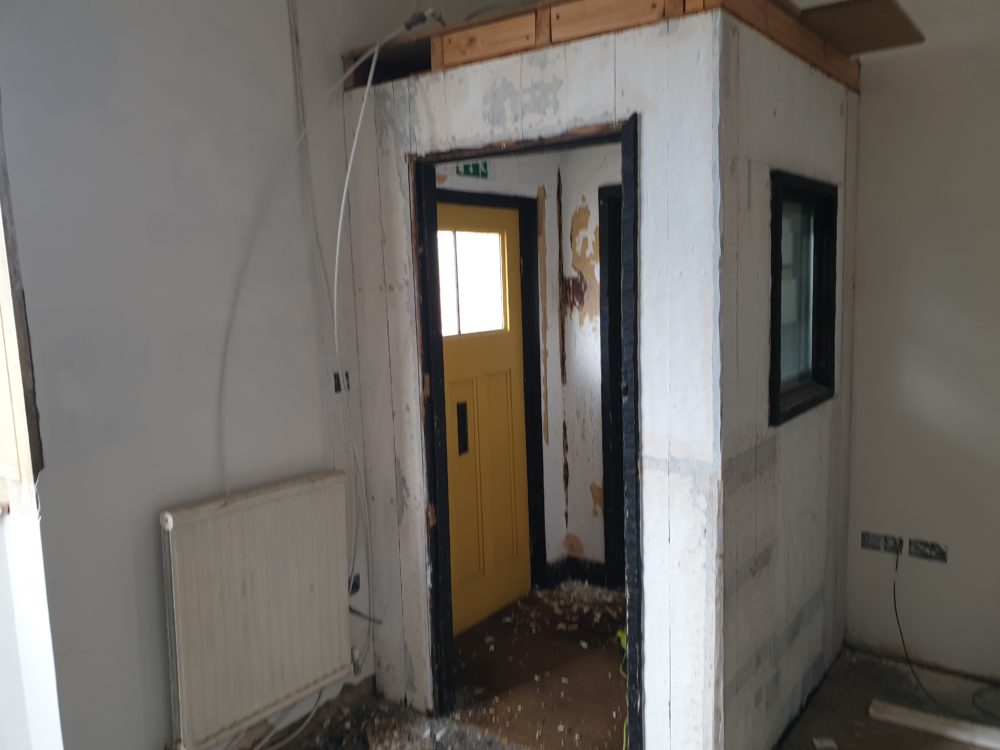
I have no idea what the cubby with the overhanging roof was for. With the addition of a little woodwork and a door it will become a handy place for vacuum cleaners and wifi.
The wall with the arch is side lit and all the bumps show up. It’ll need more work.
I did a bit of plastering on the bay window too. The plaster at the edges under the window didn’t align with the surface of the wood panelling. Now it does.
I want to bring the architrave down to the skirting to tie in the wooden panelling with the lack of panelling beneath and make the huge window opening look more grand.
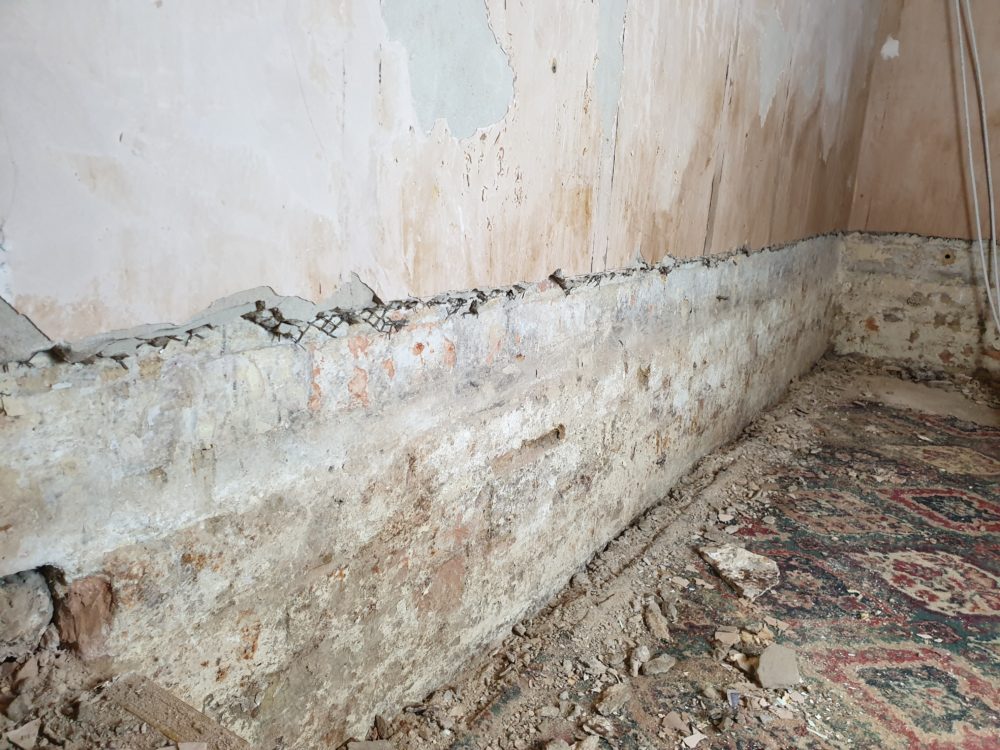
Rising damp is a problem that only started in the 1970s when it became popular to waterproof walls with cement and modern waterproof paints. Rising damp wasn’t a problem when breathable walls and coatings were the norm.
When high exterior ground levels and impermeable materials outside made water come up your wall the accepted solution was to remove the plaster and tank the inside of the wall with cement and waterproof plaster. That can never work as it doesn’t fix the water problem.
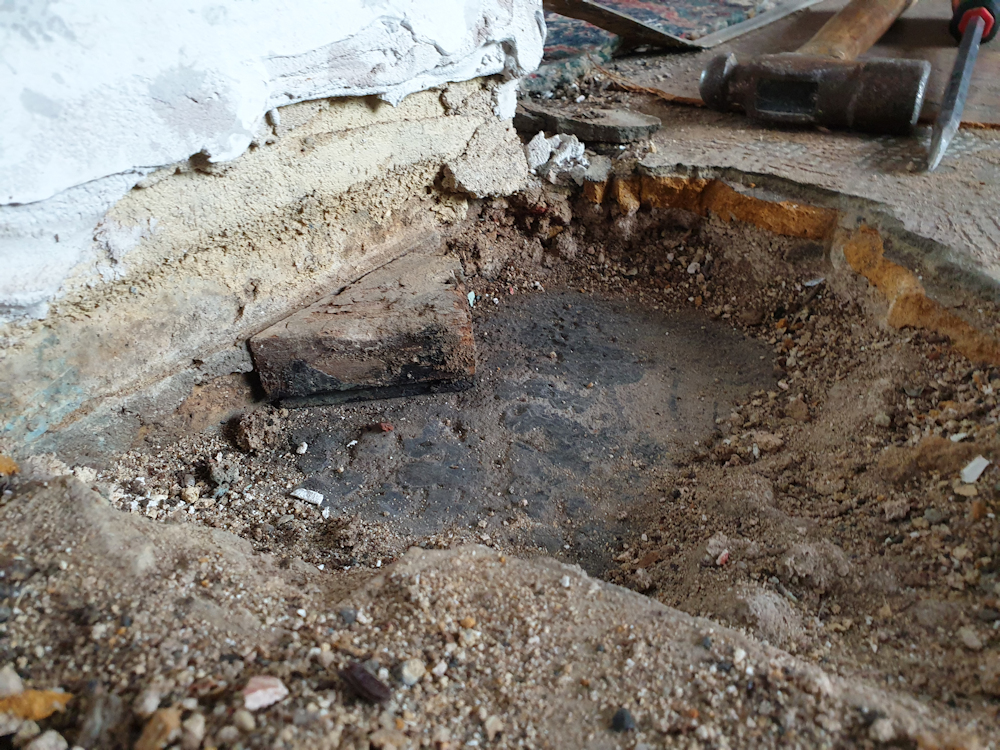
My ground floor was built on two levels. I dug a hole in the higher level floor behind the wall and the soil was not wet. There is only a small amount of water to deal with. The problem is the cement and gypsum plaster (and the waterproof paints) inside don’t allow that water to get out.
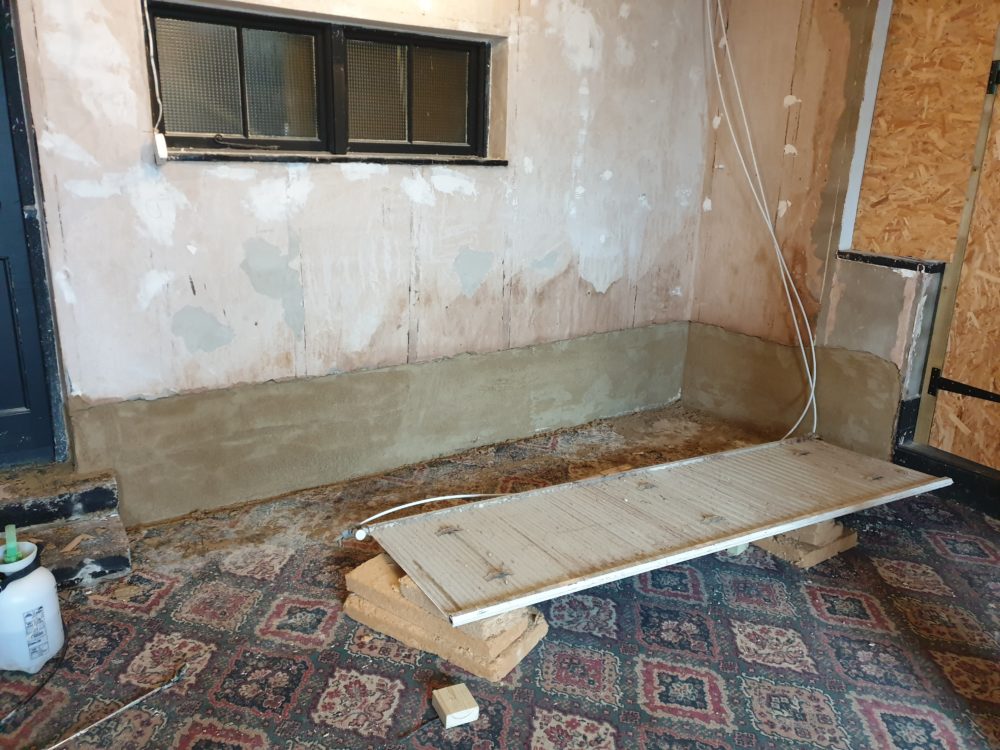
I’m planning to fix the damp problem by removing the cement and gypsum from the bottom of the wall and replace them with lime. Exactly the opposite of tanking. I’ve chipped away the cement to the point where the steel mesh hasn’t rusted away.
I never seem to get anything done on the house in the winter so I’m getting on with it again the following March. I’ve used a lime render for the base coat made from sharp sand mixed with plastering sand which comes to about 6mm below the finished surface.
I’m using St Astier Ecomortar R50 for the top coat of plaster as it can be used on top of concrete and gypsum plaster.
There is still a little filler needed especially where the lime plaster meets the existing plaster. The sand size in the lime plaster makes it difficult to get a smooth transition.
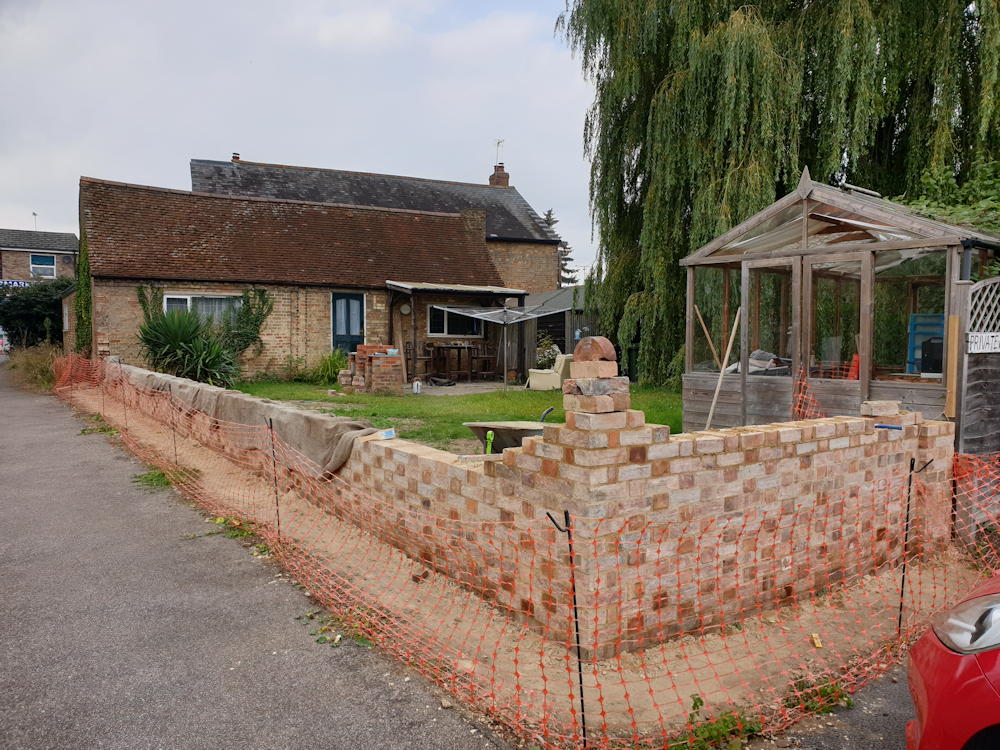
I ended up going halfway around the room. This is my cubby under the stairs which was once part of a lean-to and was presumably somewhere to put a couple of beer barrels.
I’m surprised how well the rounded corners turned out. An advantage of lime plaster is it can be worked when it’s nearly dry which makes this sort of thing easier.
I think I’ve figured out where the water was coming from. There is an inspection chamber that used to back up due to tree roots blocking the foul drain. I fixed that and things have been good for a few years. I’m suspecting the tree has found another way in.
On the plus side I found that shellac is good for blocking stains from the plaster that had been damp but shouldn’t be damp any more as any water can get out of the new lime plaster.
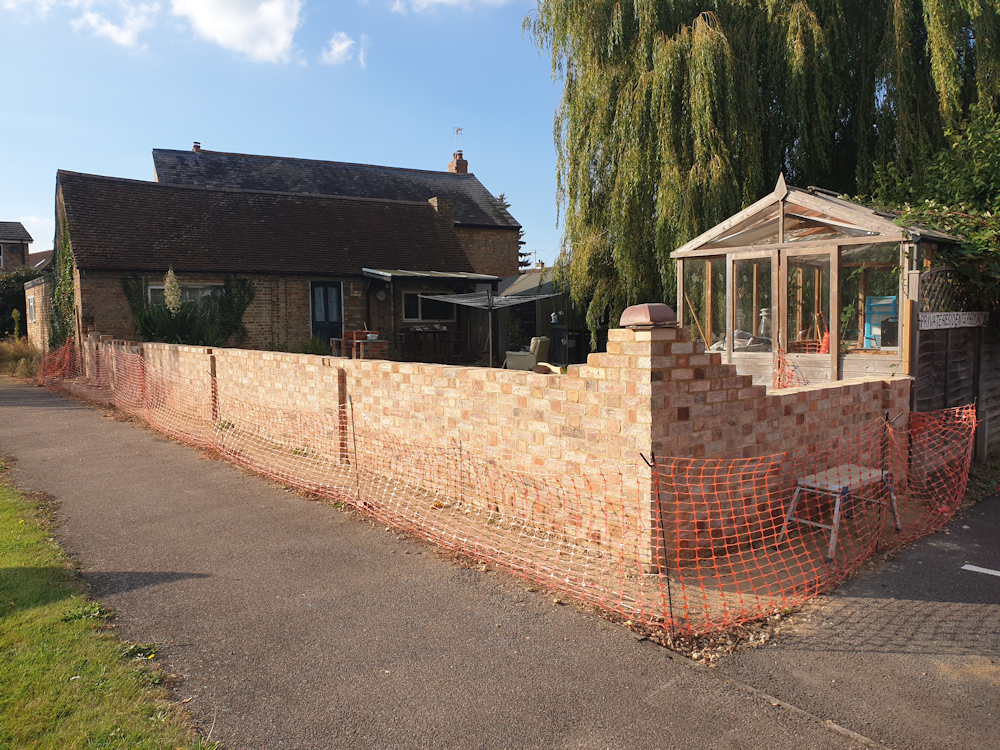
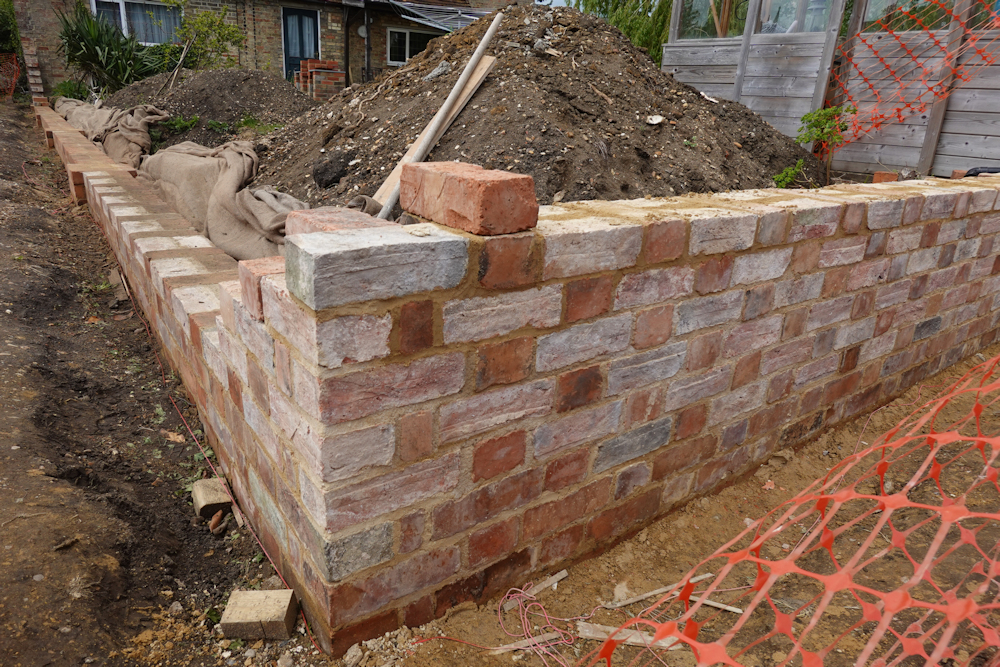
Last year the garden wall looked finished when viewed from the main road but it was still 6 courses short at the back. The weather got cold, wet and windy. I decided it would be nice to sit inside in front of the fire and worry about the rear bit of the wall next year.
I’m a very messy wall builder. The cars that park behind the unfinished part of the wall would have been splattered with lime mortar. I spent a couple of hours making a screen from bits of an old crate and some hessian to protect the cars.
Behind the screen I’ve started the coping courses. The piece of 6×2 screwed to the top of the wall is cunningly set up to position the string lines for all 3 coping courses.
Work was slowed a little by heavy rain every other day. Once the coping had made it most of the way along the wall the wood holding the string line was removed and the creasing tiles were continued to the corner using a straight edge for positioning.
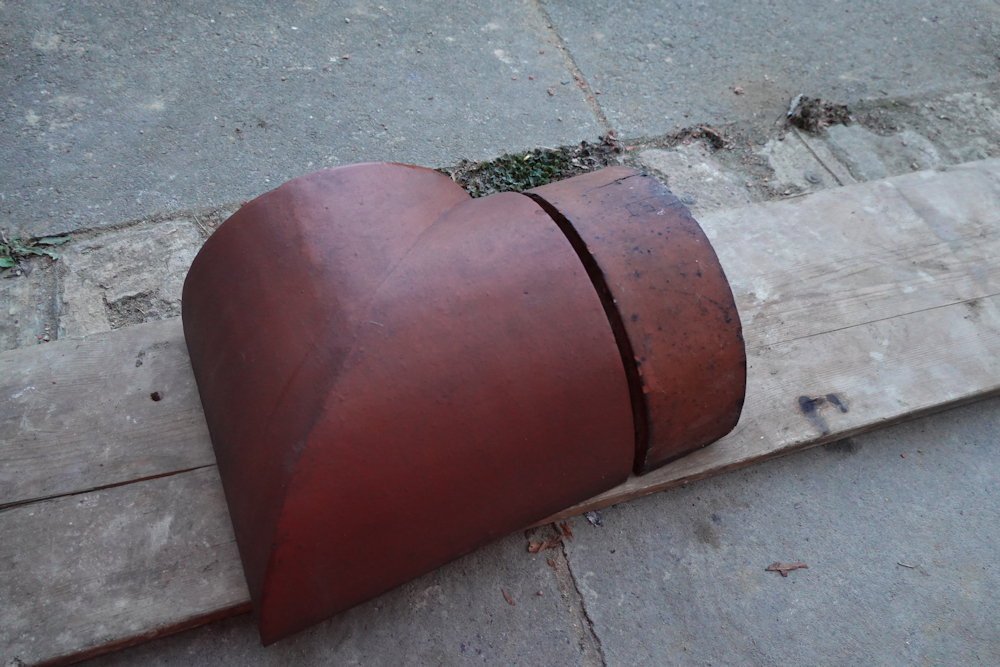
On the final day of the build the most expensive brick in the world could be set in position and used as a reference for the remaining coping bricks. It looks a lot smaller than the coping bricks in the photo. That’s weird perspective and it’s actually slightly bigger.
I forgot to add a before photo. The wall was quite unstable – in the back part the bottom of the foundations were above ground level.
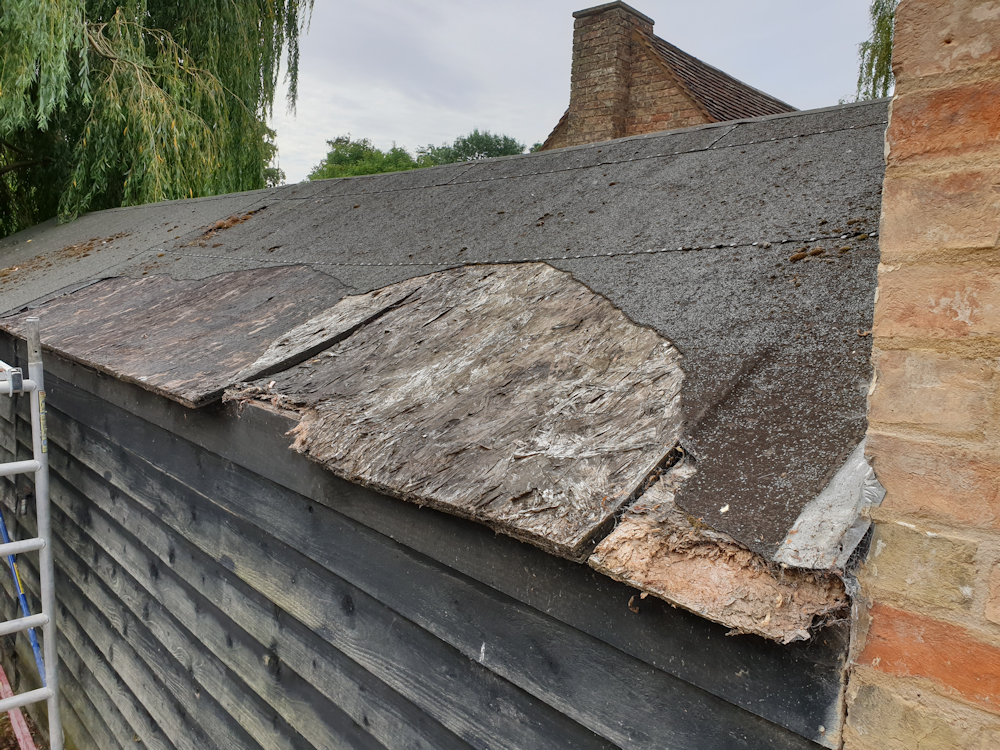
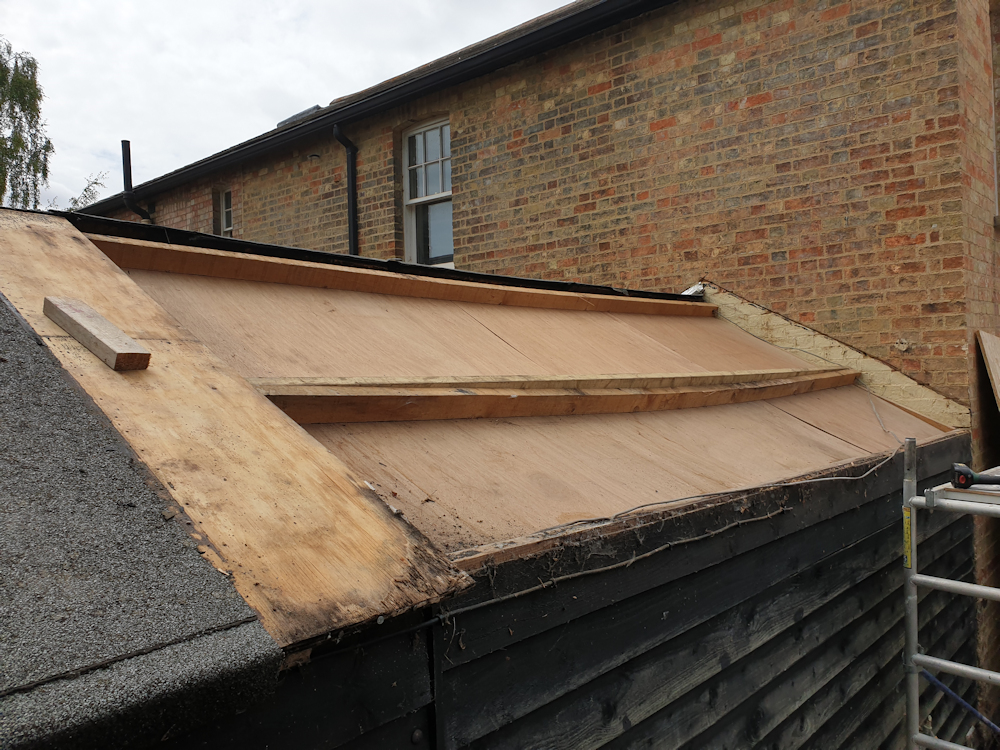
The felt blew off the utility room shed roof more than a year ago. It was old and had become fragile. The boards were too rotten to re-felt and re-roofing looked like a big job so I put it off. There is now some evidence of water ingress inside.
Surprisingly the woodwork underneath is in good condition.
The purlin was undersized and has sagged. It was 3 x 2 (inches) spanning 4m. I’ve sistered it with a length of 4 x 2 cut down at the ends to straighten the roof a little and make it easier to fit the new sheeting.
Removing the roof has angered the rain gods. I was slowed down by the first rain in weeks.
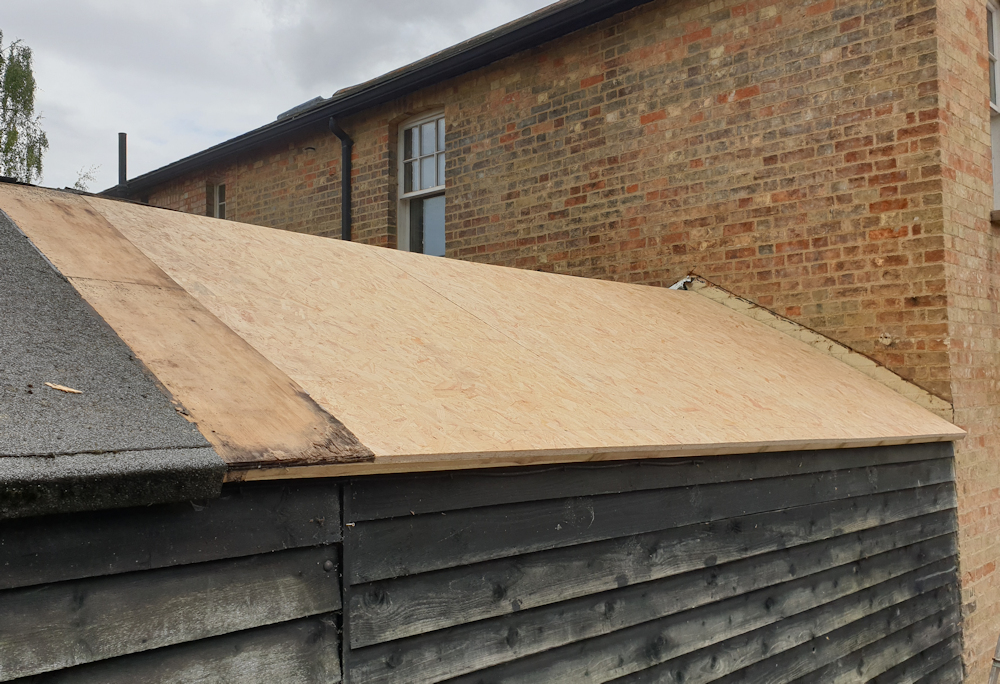
I’ve used OSB for the rood sheeting to match what was there. There are 5mm gaps between the sheets to allow for expansion. There’s a 2 x 1 inch strip of wood screwed under the front of the roof sheeting I can nail the felt to.
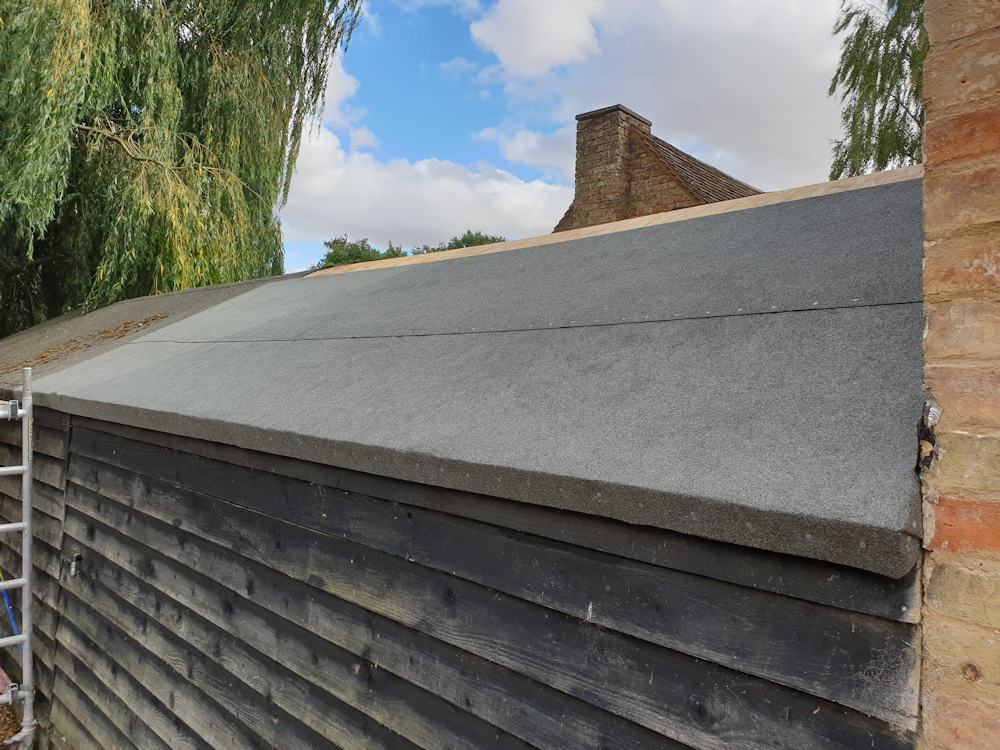
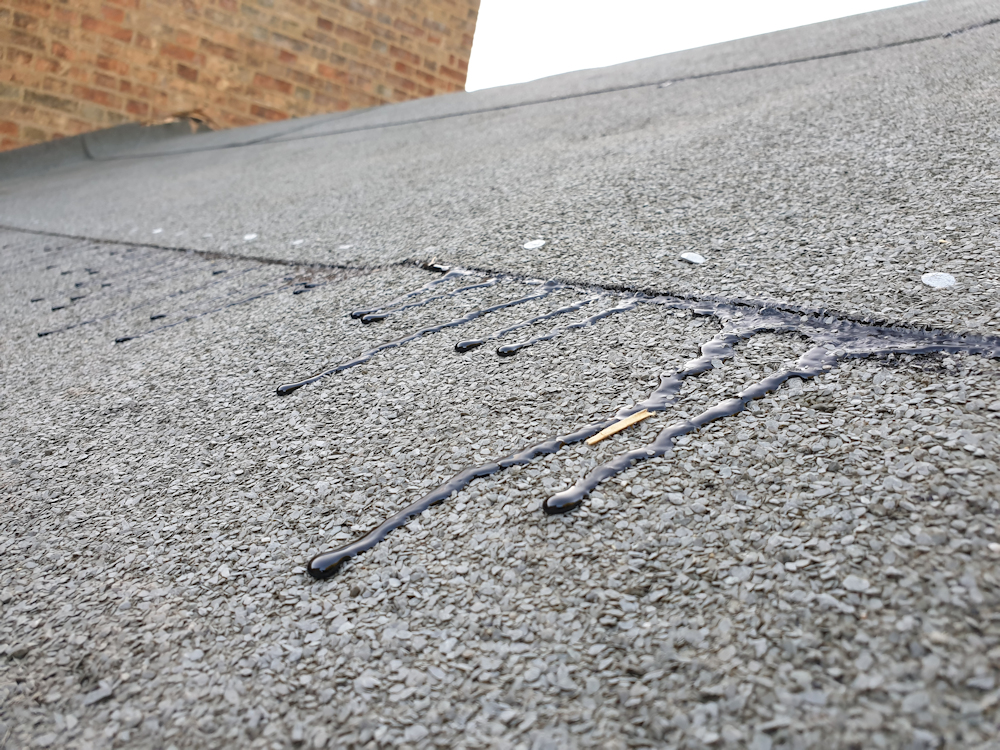
I was recommended IKO Trade Top Sheet which is a lot thicker and is much easier to use. All the edges and felt overlaps are glued with bitumen adhesive as well as nailed. The adhesive needs to be applied to both sides of the join.
It was a pain getting the felt to sit on the roof without it sliding off. I ended up nailing a bit of scrap felt to the roof and rested the new felt on that. Once the new felt was nailed on I could remove the scrap felt. It doesn’t matter much if the nail in the scrap felt is at the bottom.
It went a bit wrong on the other side. I applied some felt adhesive early in the morning when it was still cold so it went on a bit thick. Later the sun made it very hot and the bitumen went runny.
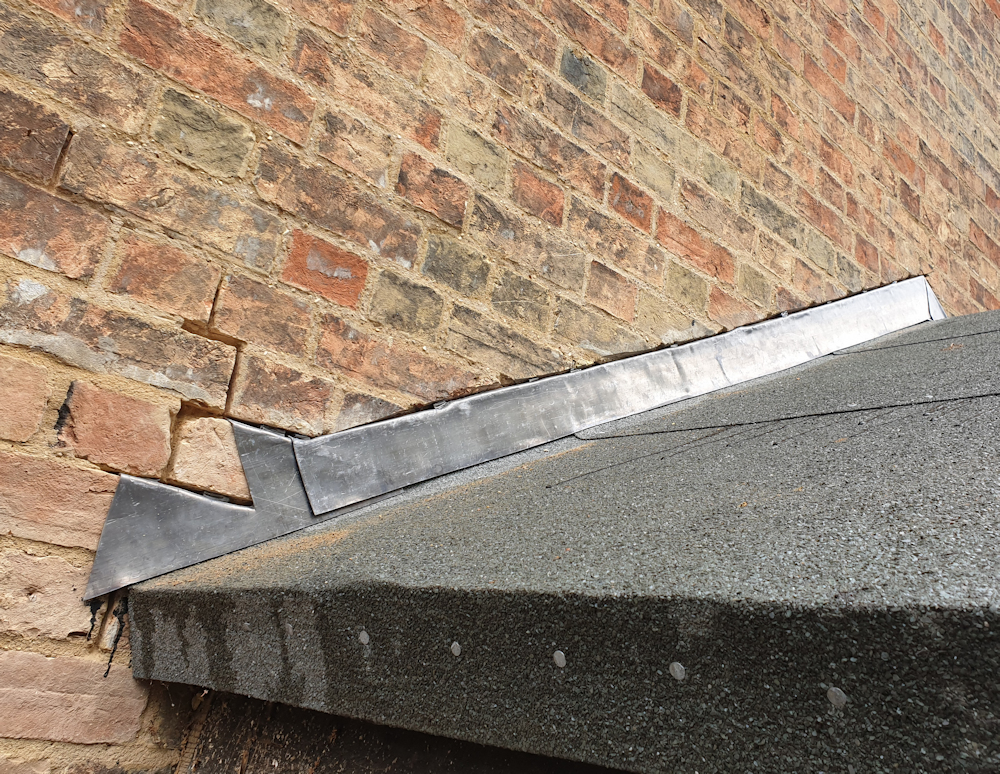
The flashing was a pain. In the past someone had cut a big gouge in the bricks and there wasn’t enough brick left for step flashing. I had replaced a few bricks and wasn’t prepared to cut a gouge in them. So I ended up with a compromise.
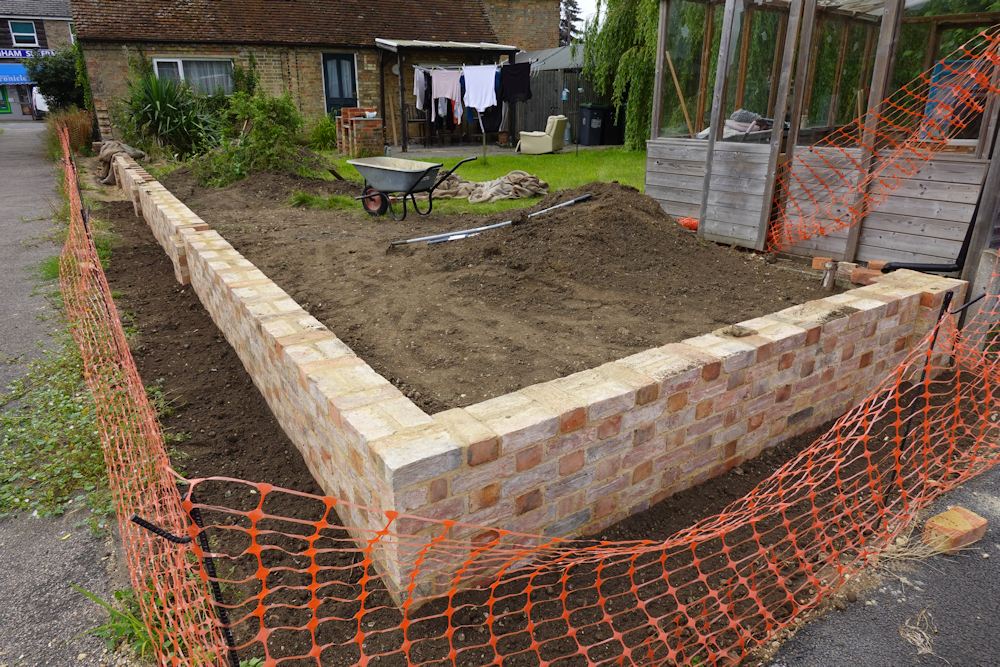
I bought a lot of parquet for the ballroom floor and it’s been piled up in a corner for a couple of years.
The problem (other than too many other lockdown projects) was the floor concrete level which needs to be one parquet lower than it currently is. There was once parquet similar to the snug as evidenced by the remaining bits around the edge (the triangular bit in the photo) they concreted over in the 1970s.
I had been putting the job off because I thought I would have to replace the entire floor. But a trial dig suggests the base of the new concrete is much weaker than I imagined and the old concrete below seems quite strong. That makes the job much easier – I should be able to knock off the new stuff and get back to the old base.
I’ve been a bit slow getting into things on the house this year. I’ve spent time in the spring fitting a new chassis to my elderly van. Then I’m busy testing aeroplanes all summer. Autumn isn’t busy yet so maybe something will still happen on the house later in the year.
I’ve realised I never get anything done on the house over winter – there is always a 3 month gap in the blog. I keep planning to do work over the winter like the electrics, the kitchen, the floor in the ballroom but it never happens. Nothing ever happens over winter especially now I have Netflix.
This year I’m planning to out-smart the house by spending the summer getting on with all the winter jobs that have been building up. Apart from maybe when the weather is nice and I can be outside doing things…
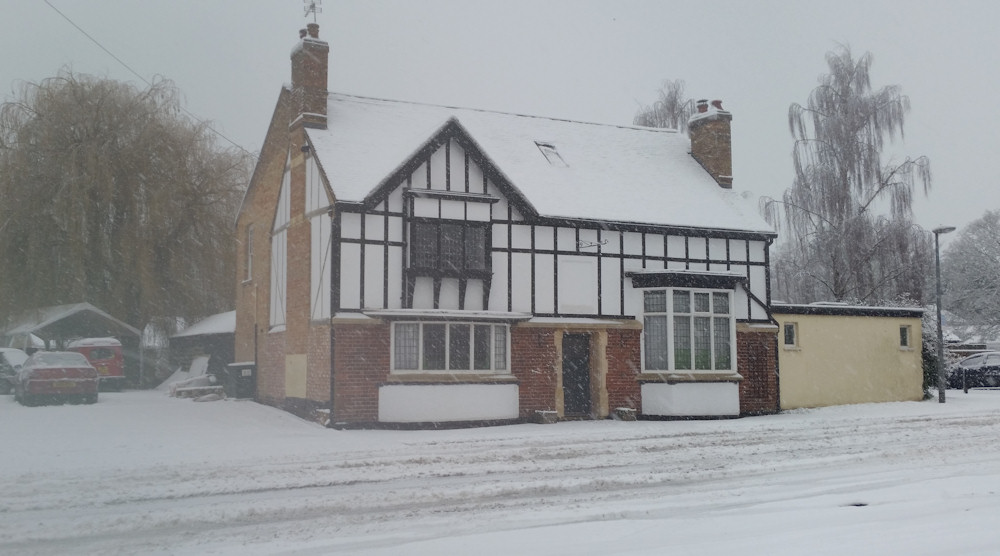
(Photo 2017 when it snowed).
Lime season is Late April to late October apart from the middle of the summer when it’s too hot. Shrinkage in the new green oak gable timber frame needs some oakum to fill the gaps.
Linseed paint season is late July to early August and the front timbers need a coat of boiled linseed as they are dusting and shedding black pigment onto my limewash. And the front door needs another coat of yellow.
The flat roof toilet block extension needs to be painted in terracotta limewash. A bit bold but probably better than Magnolia. My strategy is to paint it in a different colour from the house so I can pretend it belongs to someone else.
It’s the indoors stuff that is really holding me up. It’s been a real pain finding trades. Trades are all very busy and quotes these days are 4 times higher than usual. This year I’m planning to do all the stuff I would have preferred to outsource. I can get on with everything else next year.
Also I’m thinking about buying an E-Type project to keep me busy over the winter. I’ll need a garage for that…
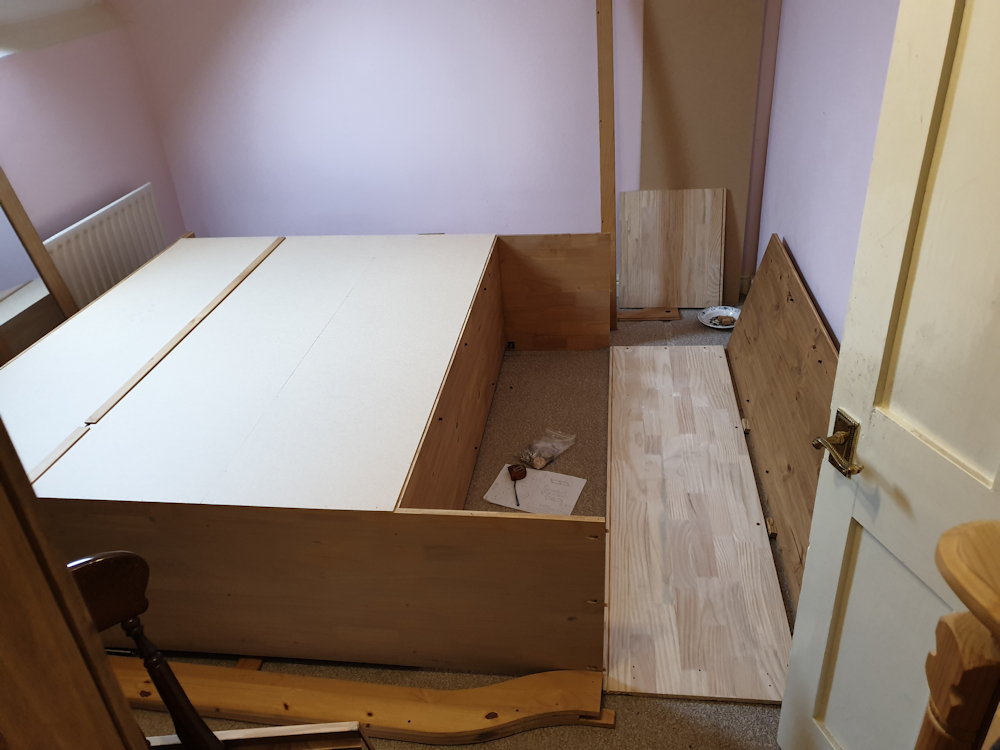
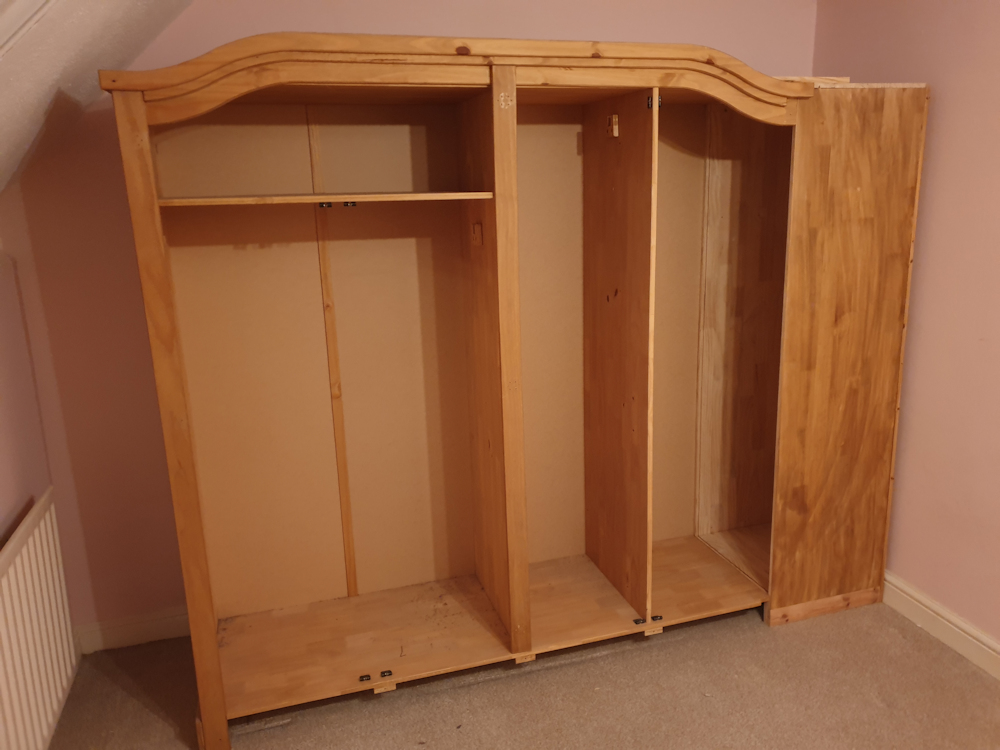
I bought a new wardrobe to stand on the wall adjacent to the existing wardrobe but that left a dead space in the corner behind and I don’t like dead spaces that will gather dust.
I hit upon the idea of buying a further single wardrobe and grafting it onto the end of one of the wardrobes to make the space more useable.
The single wardrobe is from the same range as the others but wasn’t quite the same size. It was too wide and too short. This is my first woodworking project this year. I’m out of practice and made a lot of mistakes. The fun with mistakes is figuring how to work around them so they don’t matter.
I did a few things I’ve not done before. The dowel holes turned out accurate enough but I didn’t get the cam lock fixing holes quite right so used angle brackets instead.
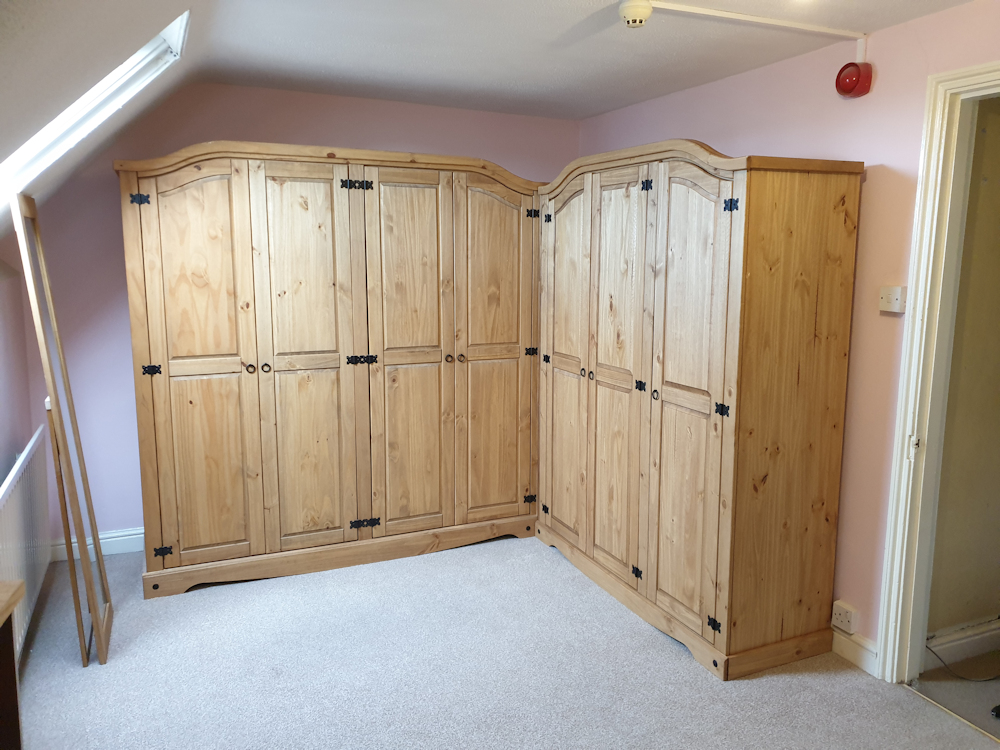
Of course it took longer than planned and it was getting late by the time I finally got everything sound enough structurally to stand it up so I could access the bedroom again for the night.
The new inaccessible extension to the wardrobe turned out handy for a couple of formal outfits that I don’t wear very often. I can slide the every day stuff to one side to access them.
A little bit of me regrets not just buying the larger wardrobe and doing an overlap.
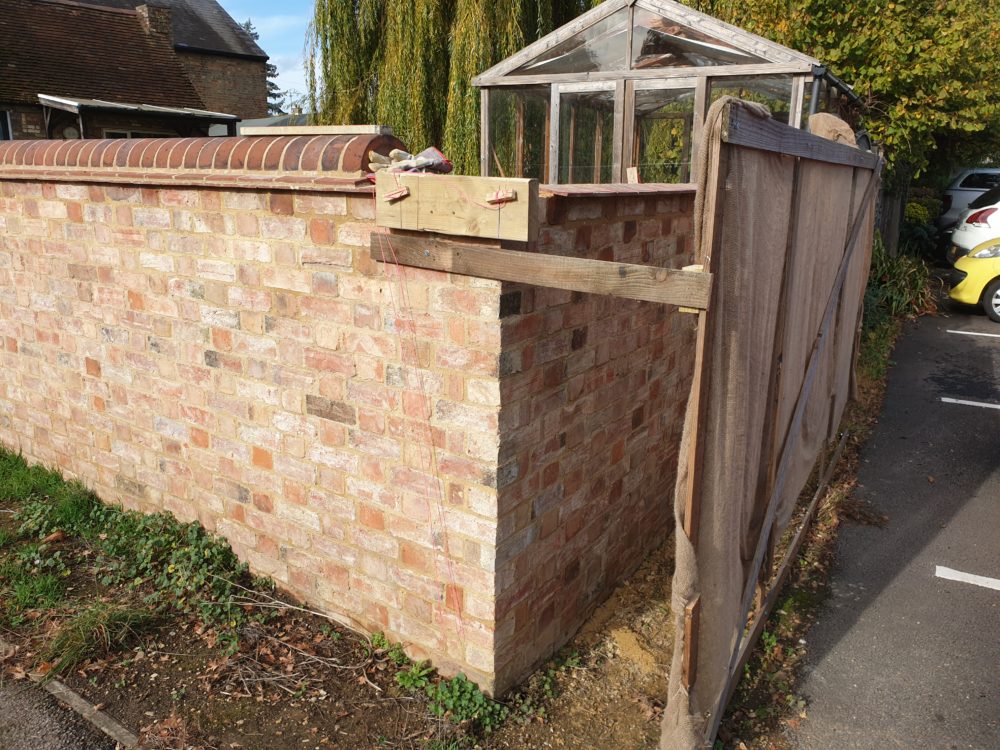
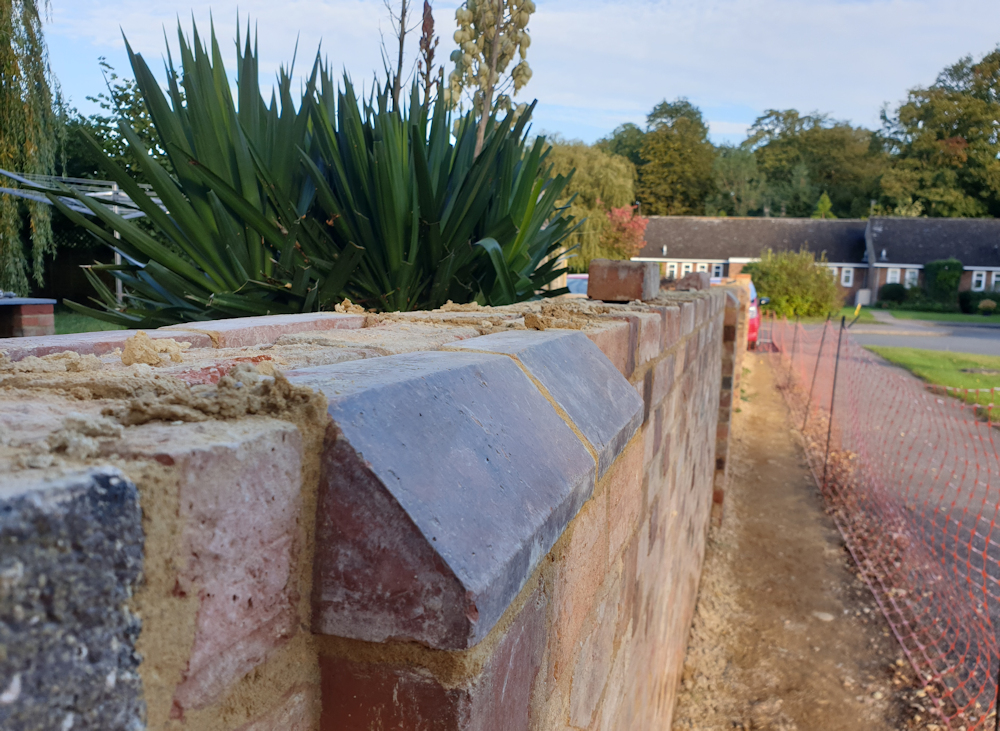
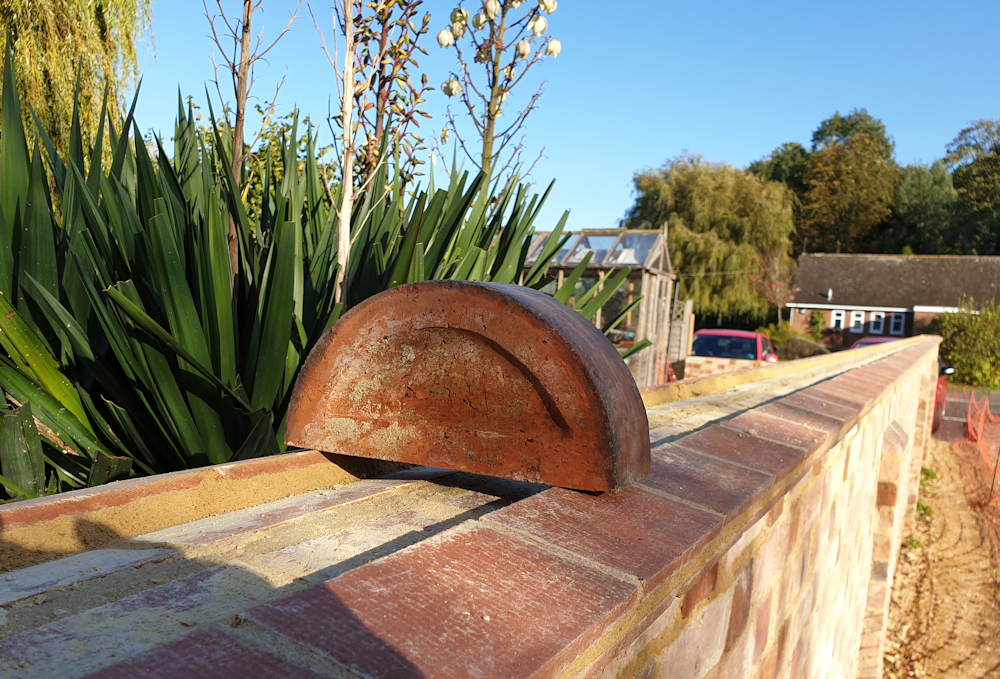
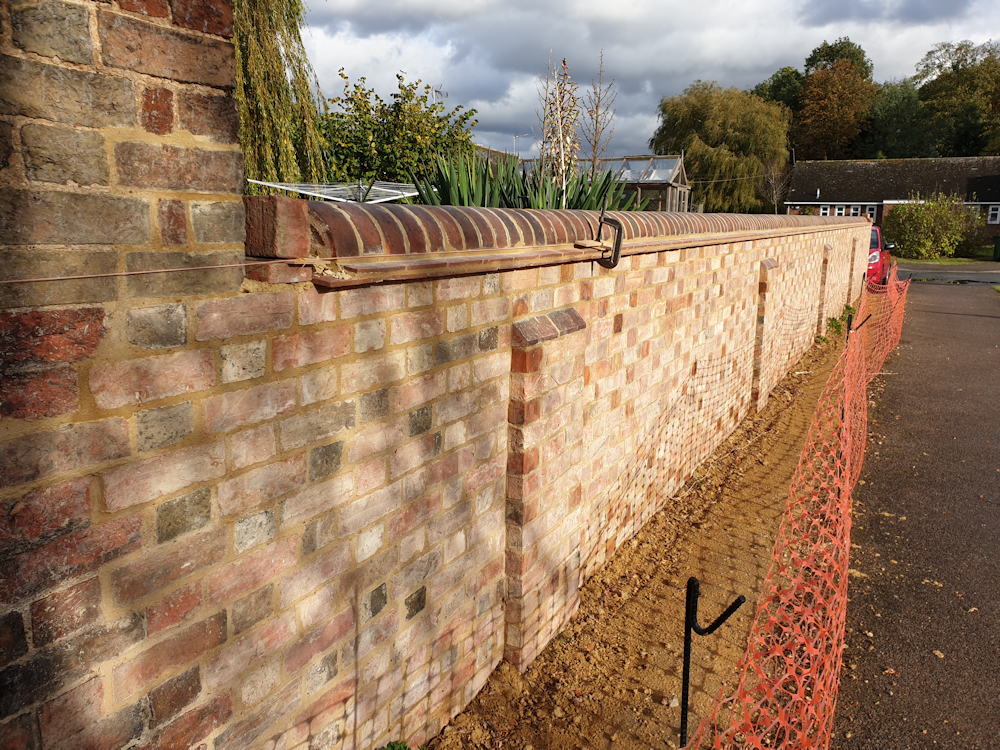
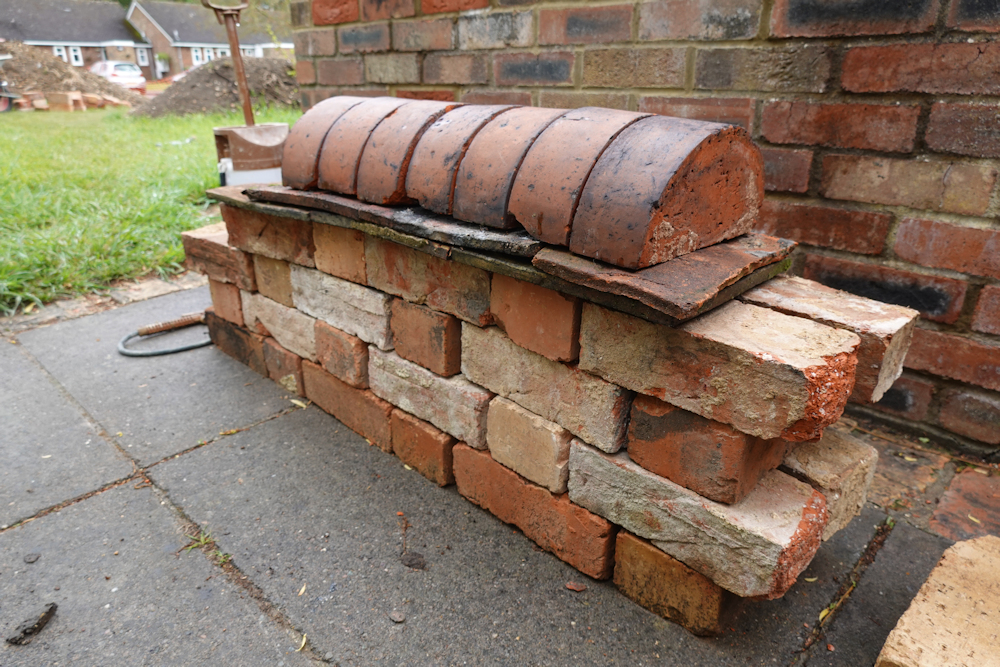
I’ve got to the top of the piers and have finished them off with plinth bricks to match the existing pier that is still built into the barn wall. The plinth bricks are red but are a little sooty and look blue in the photo.
There are 2 courses to go before the coping and I still have no idea what the original coping might have looked like. But there is spalling in the top few bricks of the existing wall incorporated into the barn gable so there was probably never an effective drip overhang.
I’m using really rubbish early 19th century bricks that are very prone to spalling. I want an effective drip overhang and did some experiments with different methods before deciding on creasing tiles. It wasn’t until after I bought them I realised creasing tiles are a 20th century invention and have no place on this wall. Oops.
Creasing tiles only seem to be available for metric walls and are too short. I’ve cut them to give me a 40mm overhang. I did some testing with a garden sprayer and found they only dripped effectively when I got to a 1 in 8 slope.
I’ve made a start on the creasing tiles. I glued a bit of tapered wood to the bottom of my spirit level to set the angles and positioned the edge to a string line.
I want to do the whole course without cutting tiles but 1mm short on the mortar gaps will leave a 10cm gap at the end. And I’m doing them by eye. I’ve placed every eighth tile along the wall so when I get to each one I can see where I need to adjust the gaps a little.
I cut the second course of creasing tiles a little shorter. They are angled more than 1 in 8 by accident but too much overlap with the coping bricks would have resulted in an excessively large mortar gap under the coping anyway.
The idea is to bed the half round coping on mortar in the cavity inside the creasing tiles to avoid too much mortar oozing out and staining the tiles. The gap between the coping and tiles can be filled during pointing.
A picture sent back from the future shows how the drip overhangs work in heavy rain. The wall is dry but the piers (that have only capping but no overhang for traditional reasons) are wet and remained wet for the next couple of days.
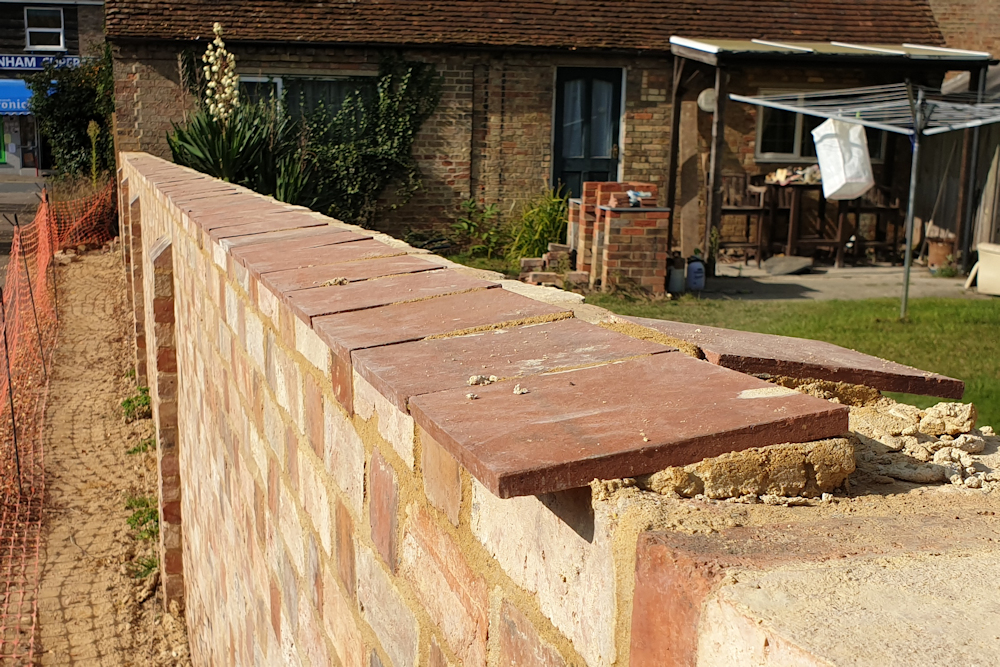
I’ve started on the half round coping. I’ve found them really tricky and am only managing 35 a day. I’ve laid 60 so far. I found it helps to have the frog orientated to accept the next brick as in the next photo. The height of the coping varies so the string line is only a long term guide and the heights are set to the previous bricks.
The coping bricks are on edge so the first joint to get right is the vertical one, after that the horizontal joint can be adjusted. None of this was in my bricklaying book. I’ve got sloping creasing tiles to shed water so don’t need the ugly sloping mortar fillet that normally fails after a while.
At about halfway through I measured the brick plus mortar gap averaged over the last 50 coping bricks and used that to mark out the position of the next 95 bricks. Using the mortar gaps I was managing naturally made it easy to maintain the brick spacing to the end.
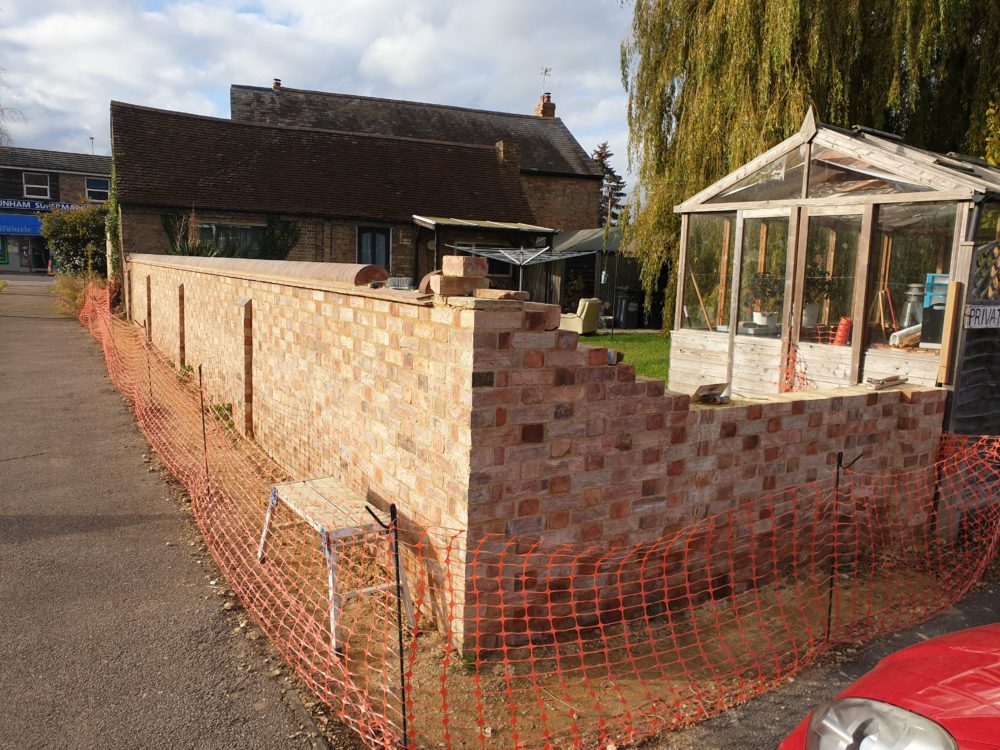
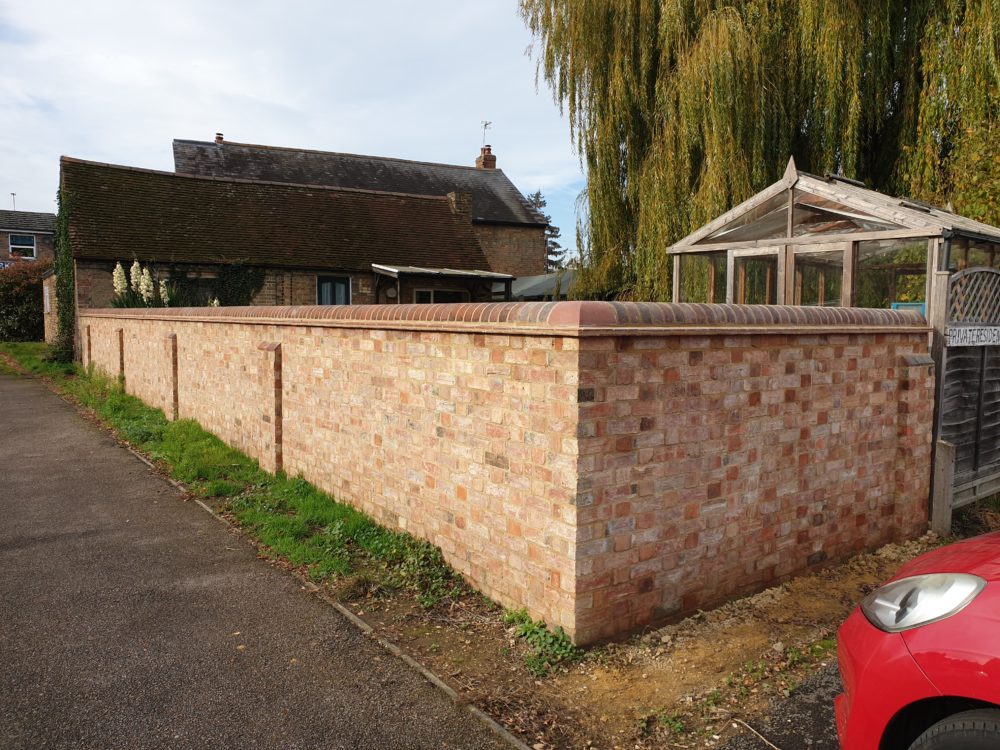
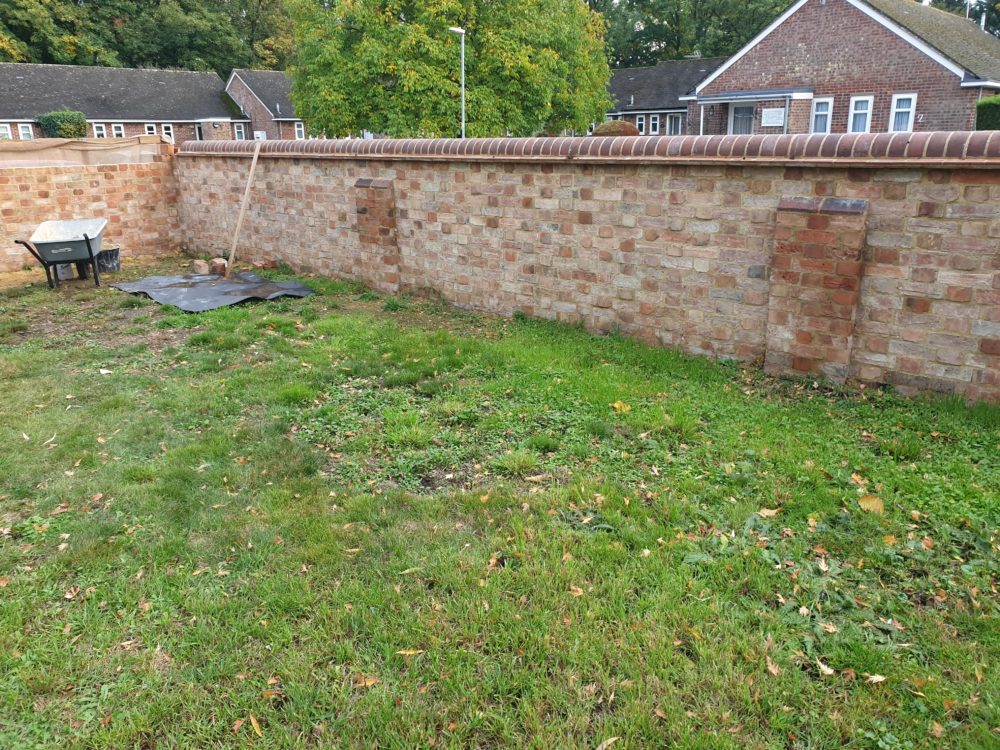
At the end of October the long stretch of wall is almost finished and it’s looking really good.
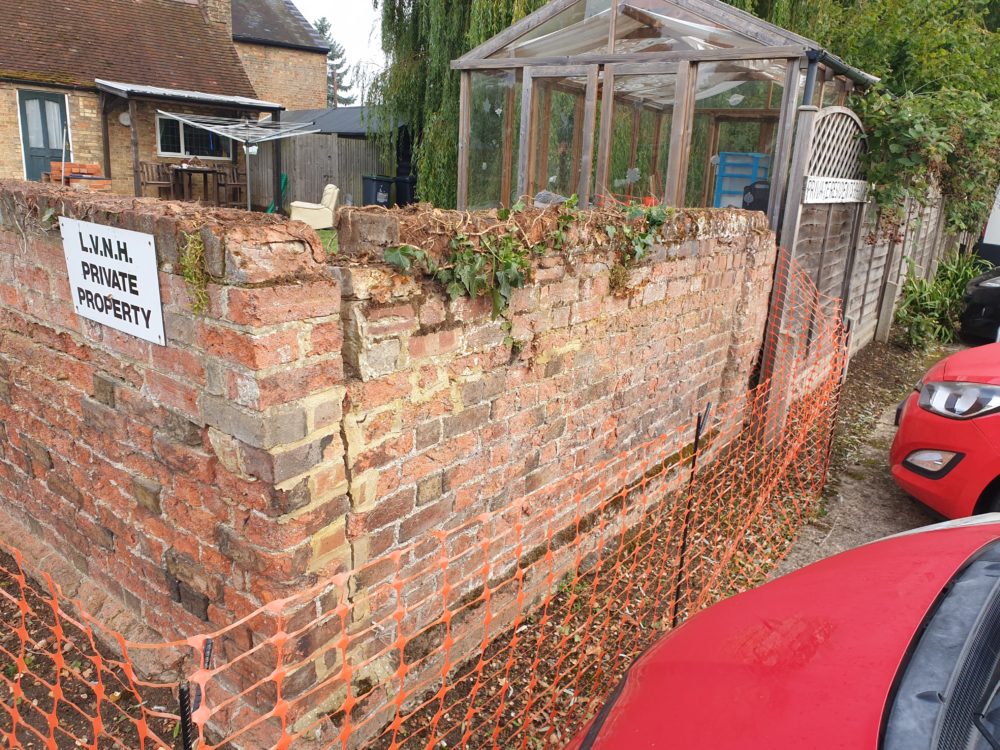
Got to post a before photo after this. It had been cement pointed so the bricks had spalled. Also a tree had pushed it over. And no nice coping to keep the rain off. It was worse than it looks in the photo. 6 inch lean increasing every year and quite wobbly at the far end.
The bricks are the same. I just turned them around. Still some spalled bricks to turn around under the barn wall but I thought it best to do the bricks under the corner first.
I left a short section at the back 6 courses low so I could climb over it rather than walk the long way around and that still needs building to full height.
But we’re into frosts now and lime doesn’t like frost. I’m going to down tools and finish off the short section at the back next year. The wall has taken all my time and there are other things to catch up on. Also plenty stuff to do inside where it is much warmer.
I’m still working on the garden wall and hope to get it finished this year. I took a week off work when the weather was suitably dreary and managed 3 courses on the 17m stretch. I’m averaging around 65 bricks a day. The bricks themselves go down fairly quickly – it’s the pointing, cleaning and setting out bricks, and cutting bricks for the piers that seems to take the time.
This weekend I built up the corner and I’m working on the 3m stretch at the back. I like the back. I can go up 4 courses over a weekend.
I’ve balanced some bricks and coping on top of the corner to figure out the height I’m aiming for. I’m aiming 2 bricks higher than the wall I took down but a brick short of the original wall height. I think I will have enough bricks but it is going to be really close.
I counted the remaining bricks and was short by 2 or 3 courses even if I clean off the stack of uncleaned bricks with very hard lime mortar that is very difficult to remove.
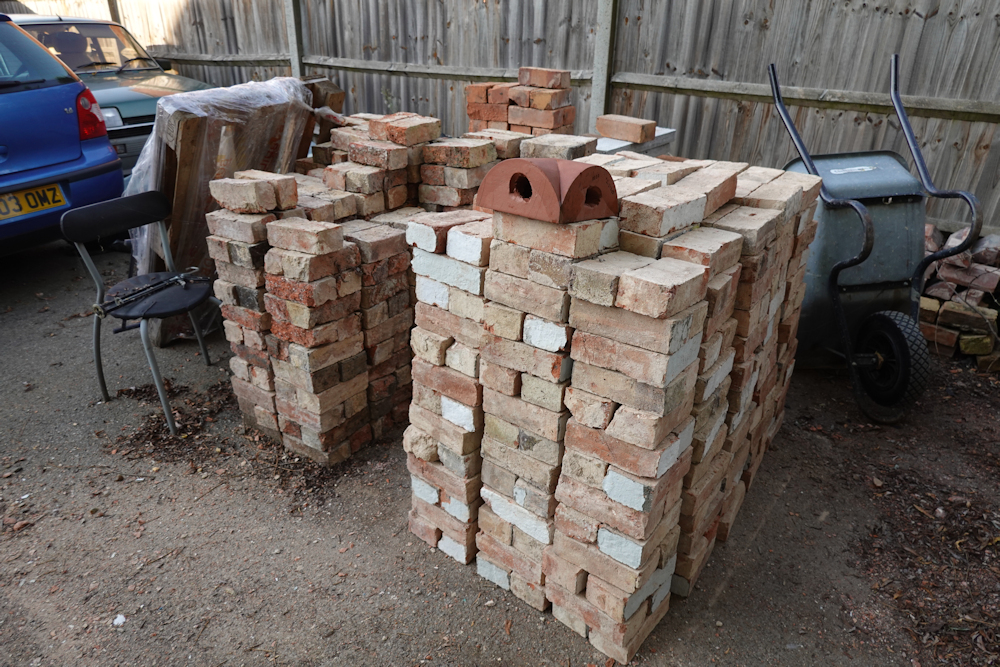
A road trip north of Birmingham to Cawarden yielded some more bricks to mix in. They are Bedford Clamps and match very well. I also bought the most expensive brick in the world – a reproduction half round corner for the coping.
I’ve been experimenting with Bebbingtons weathering tint on the corner. It started off bright orange but now it’s a deep red and matches the coping. That’s quite cool.
Towards the end of September the wall is 5 courses higher. I had another week off and had some help for a couple of days. We managed 2 courses in 2 days. There are only 4 courses to go before the coping.
I’ve built the corner up to full height and balanced the corner coping on top to get a feel for it. It’ll be the same height as the existing part of the wall that still forms part of the gable end of the barn. A brick higher than planned so I’m going to run out of bricks again.
I’ve had a lot of work this year and the weather at the weekends hasn’t always been good for garden wall building. But the wall is nearly at half height – there are already 1500 bricks in there and I budgeted around 3500 bricks for the whole wall.
The wall is high enough to backfill the trench and I’ll be sore tomorrow having moved many tons of earth. The wall looks a lot taller from the garden side now it is no longer hidden by big piles of earth.
There was some excess earth left over. I suppose there would be after putting 4m cube of concrete in the hole for the foundations. It was good exercise filling the skip.
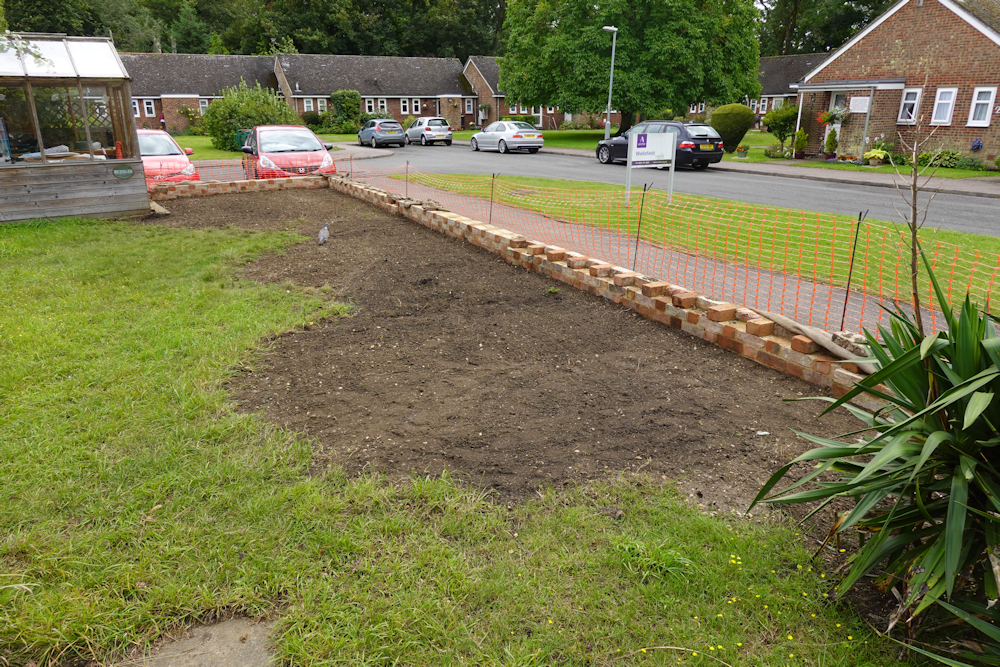
I have a bag of top soil but it’s not accessible until the skip is collected. Also my wheelbarrow has a flat tyre. Grass seeding will have to wait.
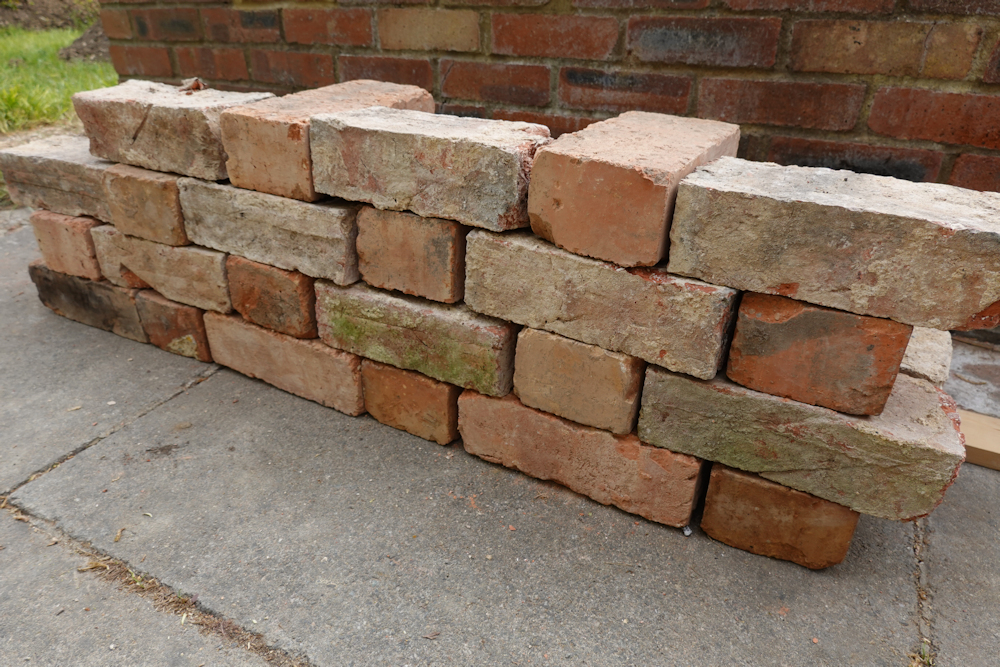
The wall is progressing at a slow pace. I’ve built the back of the wall up to 9 bricks just to see how it will look. The stretchers are the original bricks turned around and look a bit white at the moment as they’ve had lime on that face. They should become more colourful and blend in after rain cleans the bricks.
The original bricks are Bedford Clamps – they have a distinctive raised line along the stretcher face where the bricks were stacked after moulding which adds texture to the wall. They are slightly curved which adds further texture. I’ve been setting out from the new bricks I’m using as headers as they are much more straight.
The bricks are the ones used in the original wall but they look very different because they have ben turned around and have lime stains on the face. Photos of the original wall in Starting the garden wall rebuild
The pointing is the same as the rest of the house. It is trowelled flat, then after drying for a few hours struck with a masonry cleaning brush, then lightly brushed. The brushing recesses the pointing exposing the edge of the bricks and some aggregate in the sharp sand.
I’m speeding up. My record is 120 bricks a day so far. But it’s been very wet at the weekends so progress is still slow.
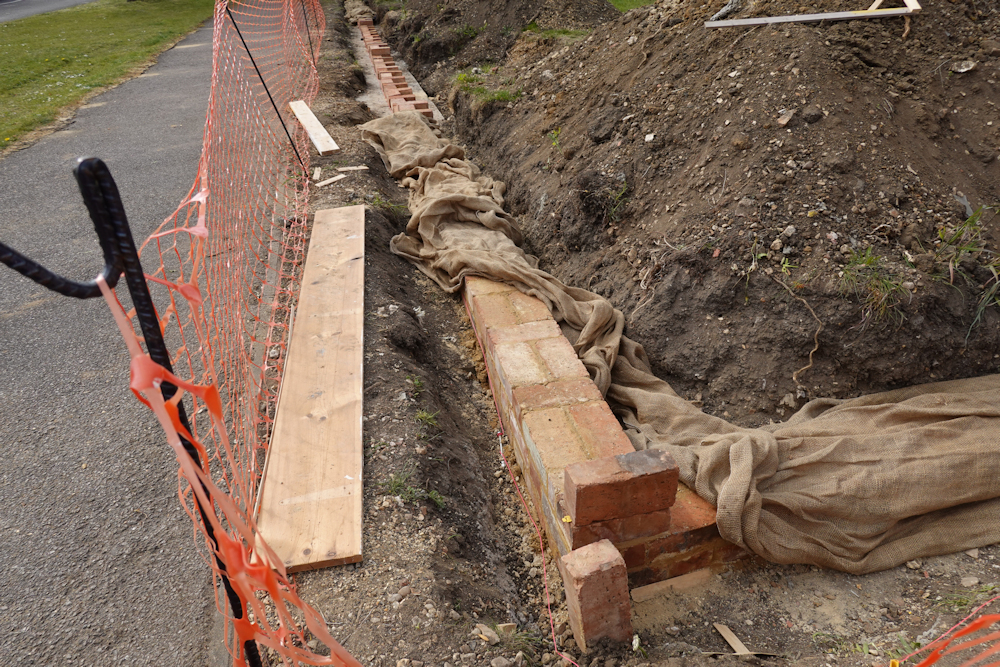
The rain helped make sure the coping and drip tiles work on the test wall. I’ve picked up 260 half round bricks from a wall that had fallen over in Nottingham.
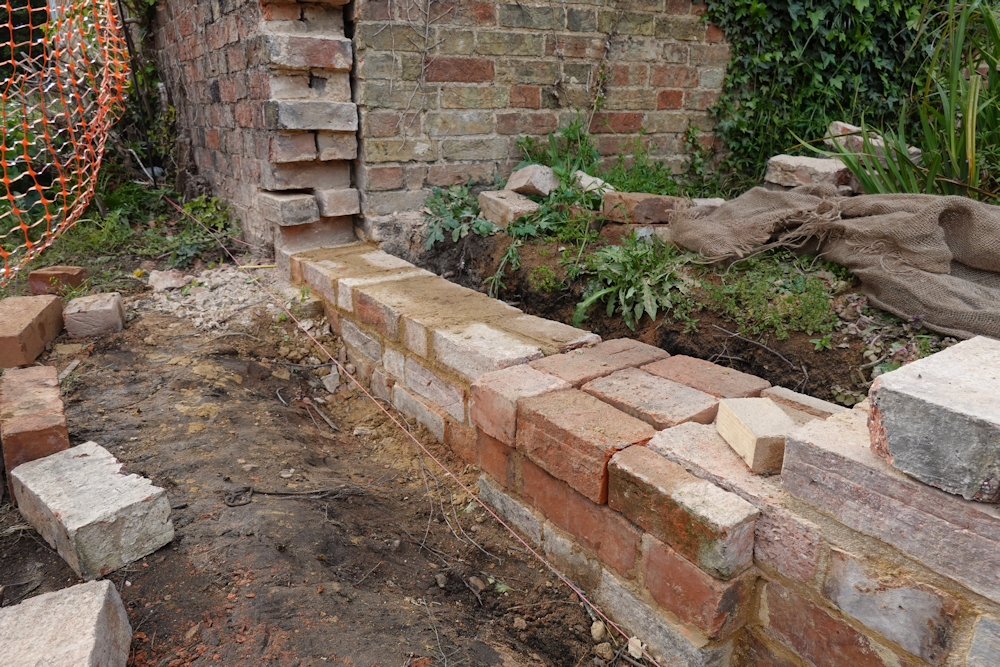
I messed up on the join to the old wall. I built the pier 1/4 brick too far along because I was working off foundation bricks that weren’t aligned with the wall. I spent a day measuring up and knew about this but forgot. No problem – I adjusted the third course to compensate.
I compensated in the wrong direction and that caused problems with the joint to the pier so I’ve removed one of the strange double headers from the original wall and now I’m 3/4 brick out on the fourth course which gives me a better bond with the (redesigned) pier. Most of the misaligned courses should be hidden underground so it should look like I messed up once not twice. The transition from the existing wall is now seamless.
Working 7 day weeks towards the end of May to help catch up on money from last year so nothing more will get done on the wall in May. I’ll post again in June. I like to have a post every month to remind myself I’ve done something useful. EDIT – Weather wasn’t great for garden walls in June but I got a week in. I’ll keep at it and post when it starts looking different.
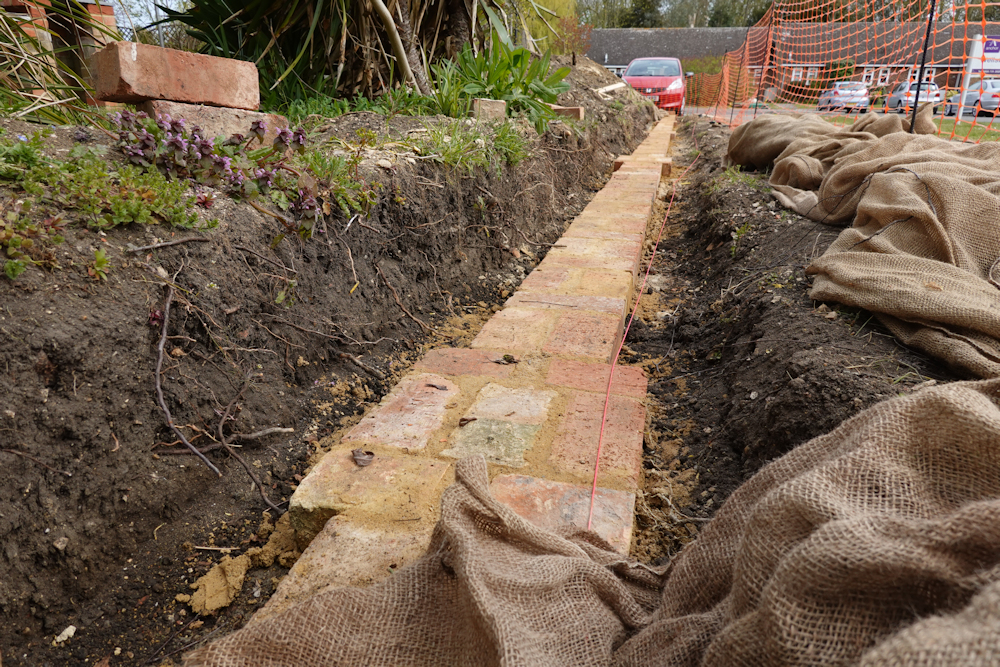
This is the biggest build I’ve attempted by myself. I’m guessing it will take 6 working weeks (edit – turned out to be 12 working weeks). I have a couple free weeks so have started laying bricks in the two courses below ground level. Laying out and setting heights has taken some time, but things should speed up once I have a straight level run to build on.
I built the corner at a measured distance from the existing wall, then laid the bricks out dry using a brick gauge to make sure I don’t end up with an odd size space in the middle somewhere. That’s worked well – I can remove a couple of bricks to mortar them in, then check the spacing is still OK before removing any more bricks.
The hessian is to keep the sun off during the day and the frost off during the night. Perfect lime building weather would be much more overcast but I’m getting a good tan at the expense of a lot of covering and watering of bricks.
The old wall was very badly spalled and only half the bricks could be saved and even those will need to be turned around. No problem I thought. I bought the same again in reclaimed bricks. But they aren’t a perfect match. They look OK as headers, but headers only make up a third of the brick count. I can lose a lot of the new bricks in the foundations, and I think it looks OK if I keep using the new bricks one brick above ground. I made a spreadsheet to work it out and have been trying all sorts of ideas.
The wall has 4 piers on the long face sticking out by a quarter brick both sides to match the original. The piers go in last to avoid disturbing the string line.
I had guessed I could lay 100 bricks a day and managed 80 bricks a day on the long straight run. I will hopefully speed up on the next courses as bricks below provide additional reference. Each course has 190 bricks so it’s not going to be a quick build.
It’s useful to have a couple of courses below ground level. It took me a couple of bricks to get everything straight and level and most of the pier positions shifted very slightly while I found out what mistakes I could make with brick spacing. At some point they will need to go up straight.